A quick and easy tile backsplash
Refresh your kitchen with this simple makeover


Quick fix is a relative term. Installing a tile backsplash is actually a weekend-long job. The first day is spent on layout and tiling. Twenty-four hours later, apply the grout, sponge off the excess; apply grout sealer and you're done. But let's take it back a step or two.
Unless you've tiled before, your first step is to head to the hardware store. You'll need a notched trowel, grout float, adhesive, grout, spacers and tiles.
Start off by measuring the wall(s) to be tiled. Mark a centre line and then do a dry run with tiles and spacers. If there's less than half a tile to complete the row, adjust your centre line.
You can also mark off a grid with a chalk line. A grid helps you visualize tile spacing and it also acts as a guide when applying adhesive. Use your trowel to spread the glue on the wall in cornrows. It will form a skin fairly quickly, so lay down one row's worth of adhesive at a time. Starting with the bottom row, apply the tiles with a twisting motion to work them into the adhesive. Cover at least 80 per cent of the back of each tile with adhesive.
Plastic spacers come in a number of widths. You simply butt the tile you're applying up to spacers at the side and top of tiles already in place.
When you get to the end of a row, you'll probably need to trim tiles down to size. You can pick up a pair of tile nippers to cut edges off (ideal for shaping tiles around outlets and switches). A manual tile cutter works on a two-step process: score the tile, then use the handle to apply pressure on a rubber pad. This snaps the tile along your score line. With a wet saw, the bottom of the blade is immersed in a pan of water. The liquid keeps dust and friction to a minimum.
Let the glue set for 12 to 24 hours before you apply the grout. Work the grout between the tiles with a grout float. After it has dried, clean off the excess with a damp sponge. Finish by applying a grout sealer.

1. Mark the centre of the wall and then lay out the tiles in a dry run. Adjust the layout line away from the true centre of the wall if less than half a tile will be left in either corner.

2. A chalk line will help you visualize the layout of tiles as well as act as a guide when you’re applying the adhesive on the wall. Don’t let the glue skin over before you affix tiles to it.

3. Use a notched trowel to apply the adhesive on the wall in cornrows. In corners and on the last row, you may need to apply the adhesive to the back of the tiles rather than the wall.

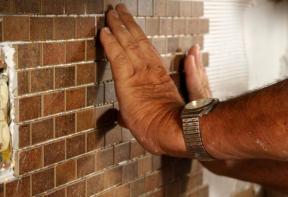
4. With the adhesive applied to the wall, use a gentle push and twist motion to set each tile firmly. Try to get at least 80 per cent adhesive coverage on the back of each tile.

5. Plastic spacers are inexpensive and they can make the job of getting consistent grout lines a breeze. They come in a variety of thicknesses, depending on the width of grout line desired.

6. Tile cutters are a “snap” to use. Score the tile with the sharp edge, then press down on the tile with the rubber pad. The applied pressure will break the tile along the scored edge.

7. For tricky cuts, you can also rent a tile wetsaw. They’re available at most building centres (approx. $50/day). They’re messy, but make quick work of cutting thick or bevelled tiles.

8. After the adhesive has set, apply the grout. Mix according to package directions and work the material into the gaps with a grout float. A drop sheet makes counter cleanup easier.

9. About 20 minutes after applying the grout, you can begin to remove the excess material with a damp sponge. Give the tiles a polish with a dry rag and then apply sealer to the grout.
No comments