Spring clean your property
It’s been a long, long winter. As warmer weather starts to arrive, here’s what you need to know about maintenance for your yard, home exterior and landscaping features


The snow is melting, the sun is shining, and your eavestrough is leaking enough water to create a small pond in your backyard. Ah, the joys of spring! If you’ve discovered a whole host of problems with your property as the snow recedes, you’re not alone. We consulted Toronto landscaper Rick Hofstetter of Hofstetter Landcaping for DIY tips to get your yard in tip-top shape for summer barbecue season.
Eavestrough troubles
Leaking eavestroughs are a common problem and it usually comes down to one of two things: blocked eaves or ice damage.
When the next big thaw hits, get up on a ladder and make sure that water has a place to go: Pull all debris from the troughs and make sure your downspouts are clear. Also ensure your downspouts point away from your home, so water doesn’t pool around your foundation, causing leaks or flooding. If you’re lucky, this will help stop ice from building up and then flooding when it melts.
If the ice has damaged your eavestrough, it’s time to replace it. If it’s a joint that’s leaking, you can caulk the joint with some roof-repair caulking or construction adhesive and call it a day. If there is a hole in your eavestrough, it’s up to you as to whether you want to do a patch (whereby you snip out the offending section with tin snips, cut a new section to overlap the old edges and rivet it back together) or simply replace the section.
If your eaves are sagging, you need to replace the spikes and ferrules holding the eaves to the house. The trough should always run down to the nearest downspout, so your eavestrough should never be perfectly level. For more DIY tips, check out Stop the drip.
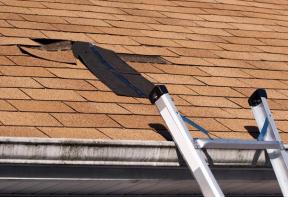
Roof repair
Every year, get up on a ladder and inspect your roof for damage from winter’s ice and snow. Shingles shouldn’t be curled, torn, cupped or missing; if they are, you’re going to need to replace them. If it’s only a few shingles, you can often DIY; if your entire roof is in bad shape, you should call in a professional to replace it. Also look for damage or deterioration of the flashing around chimneys, vents and other joins in your roof; damage or deterioration in the low spots on your roof; or pooling of water in areas of your roof. All these are signs of a roof that’s in trouble.
It’s also important to look inside your house, too. Go up into the attic with a flashlight and check for water stains, which indicate leaks; this is especially important to look for around flues, plumbing vents and chimneys. If you are comfortable resealing the join or flashing, and the wood isn’t damaged, give it a shot: chip out the old caulking and mortar along the edges, and recaulk to joints. If there is extensive water damage inside the house, call in a pro.
The old heave ho
If your patio or interlocking driveway isn’t quite on the level anymore, you can blame frost heave: As the ground freezes and thaws, it expands and contracts. Heaving or sinking can affect anywhere from a few stones to your entire patio, driveway or walkway. But before you reach for your tools, landscaper Rick Hofstetter says it pays to wait a little longer before starting this DIY: “If it’s the early part of the spring, chances are, if you allow it a little time for the winter to get out of it, it might settle itself down.”
If you’ve given the stones plenty of time to settle, but they’re still a jumbled mess, here’s how to straighten them out.
First, pour water on the sand around the stones you want to repair. This will soften the joints.
Next, tap the stones with a rubber mallet; they should start to shift.
Dig out the screwdrivers or, if your stones are 2 x 2 feet or larger, a shovel, to pry them up. “You may possibly chip the stone,” says Hofstetter, “but by watering and tapping it, you’ve softened up the sand that’s between the stones so you’ve got a better chance of getting it out. Hopefully you have a few extra stones kicking around, anyways.”
Once you’ve got those pesky stones out, here’s what to do:
Heaved stones:
Dig out the extra base material until you have a level surface for the brick. Gently tamp the surface, then replace the bricks and fill the joints with sand again.
Sunken stones:
Put a little sand under the brick to fill the hole and level it off. It’s very important to tamp the base material down, to make sure you get all the air out and provide a solid surface for the bricks to rest on. Fill the joints with sand.
“The base of the job is the most important thing,” Hofstetter says. “If it’s not there, if it’s done so badly in the first place, it’s not a matter of repair, it’s a matter of completely replacing and ripping out the old stuff to redo it properly.” If you find the same problems cropping up year after year, or have large areas of your patio or driveway affected, it would be well worth it to have a professional come in to discuss having your paving stones re-installed with a better base.
Hit the deck
Frost heave affects more than just stones: Your beloved back deck can fall prey to it, too. “If your deck has heaved, it’s a situation where it wasn’t done right in the first place, “ Hofstetter says. Most decks, especially those utilizing deck blocks, are more likely to sink, but if you have concrete footings that weren’t dug far enough into the ground, you’re also susceptible to heave.
If you want to remedy the problem once and for all, the best solution is to dig temporary holes and install temporary footings to hold up your deck. Then, dig down four feet, or below your area's frost line, and redo your original posts the right way: using poured concrete, sonotubes and proper fittings. “It’s a lot of work,” Hofstetter concedes, “but it can be done.”
If you’re not ready to invest the manpower or your deck is due for rebuild in a few years anyway, you can jack up the deck and either wedge up or shorten the deck post. “It’s not a professional way of doing it, it’s a homeowner way of doing it quickly,” Hofstetter says. But hey, it works.
Pond patrol
Before you start up that pump, remove the leaves that overwintered in the pond. “On some of the jobs we go to, we just pull all the rocks out of the bottom and wash the whole thing down,” Hofstetter says. While he admits it’s time-consuming, it does have its benefits: Not only do you get all the rotted leaves out of your pond, therefore avoiding a mucky bottom, but your pond will smell better, too. “Before long you’re going to get water that smells like a toilet or a sewer pipe, because the leaves are rotting,” he says.
Unfortunately for your fountain, if any of the plumbing is cracked or leaking, you’re going to have to replace it. You might get away with tightening the joint if it’s held by a hose clamp, but Hofstetter says, “The bottom line is, if the fitting is leaking, you probably have to replace all the ABS fittings at that point.”
Watch your wood
If you have arbours, fences or other wooden features in your yard, it pays to maintain them properly: “Procrastination costs a lot of money: You can say, I’ll paint it next year, and then next year say, I’ll paint it next year, and before long the wood’s rotted and you can’t paint it!” Hofstetter says. Inspect all wooden surfaces (including your deck) annually and repair or replace as needed.
Now that all your spring maintenance is done, all that’s left to do is watch your garden come back into bloom. “A garden is a labour of love; you’re constantly, year after year, in love with your backyard because you’re never going to stop!” Hofstetter says. And with our handy property maintenance tips, your back garden will look lovely from your newly level patio or refinished deck–once the pond from the eavestrough evaporates, anyway.
To leave a comment, please log in


No comments