This shop project does it all: it adds efficiency, accuracy and much needed storage space, all the while keeping your workshop air cleaner.
I built the cross-cutting station for my mitre saw around two metal tool cabinets and a manufactured dust-collection table. You can create the same dust-collection capabilities with a shop-built dust table connected to a vacuum system. I used Baltic birch plywood, although veneered ply or even fir plywood would work fine.
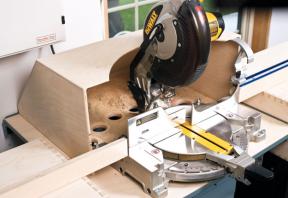
Start by deciding how you’ll support your mitre saw. Mine sits on a Delta downdraft table (you could also build a vacuum table that connects to a dust collector) fitted with a wooden support surface that’s drilled with an arch-shaped array of 2 1/2"-diameter holes positioned to catch dust that spews from the saw. You’ll need to customize the arrangement of these holes to match the sawdust spray coming from your saw.
Next, determine the height of the storage boxes you’ll need to build to create a level support surface extending beyond each side of your mitre saw. Level your saw support cabinet, then park the tool cabinets you’ll be using next to it–one on each side. Use your level again to determine the overall height of the storage boxes you’ll need for support, minus 1/8". During final assembly, you’ll raise the precise height of the storage boxes to line up with the work surface of your saw by adjusting the position of four wood-screw feet–one in each corner of each box.
I chose to use machine-cut dovetails to join the storage boxes because I tend to obsess over things such as this. Ordinary butt joints–screwed, nailed, biscuited or dowelled–work just as well for saner folk. With your boxes complete, set them where they belong on the tool cabinets and check their positions relative to the work surface of the saw. Remember, you want the tops of these boxes to be slightly lower than the cabinet at this stage. You’ll finesse them up to the perfect height later with the adjustment screws.
When you build drawers to fit your boxes, be sure to incorporate the correct amount of drawer clearance. I used mechanical slides for my drawers, and as with most, these require 1/2" of space on each side. Build the boxes, install them on their slides, then add drawer faces. I chose an inset drawer-face design to help keep sawdust out of the drawers more effectively.
Continue by drilling pilot holes for the four screw feet in each storage box, install screws, then adjust their height so the tops of the storage boxes are on exactly the same plane as the working surface of your mitre saw. It’s also important that each box rests solidly on the top of its tool storage cabinet. No wobbling allowed.
Although you could use this saw support system as it is, without a fence, the project will prove much more useful for cutting longer pieces of wood accurately if you go through the trouble of installing a fence. I built mine around the Kreg Precision Trak and Stop Kit. It includes a graduated aluminum extrusion that fits on top of a shop-built wooden fence. Swivelling stop arms slide within a groove in the top of this extrusion, allowing you to complete identical, repetitive cross cuts.
Regardless of the fence design you choose, it’s essential that the fence surfaces extend beyond either side of the saw on exactly the same plane as the saw fence itself. And for this arrangement to happen, both support boxes need to be fastened solidly to the surface that the mitre saw is bolted to. There can be no movement among these components. The easiest way to accomplish this on my set-up involved driving screws through the metal edges of the dust table and into the sides of the storage boxes. Something similar will probably make the most sense if you build your saw support stand from scratch.
Any dust hood you build for your cross-cutting station has to be customized to fit your saw. I built mine around a 10" non-sliding DeWalt mitre saw. There are times when I’d prefer to use a bigger saw in my shop, but this doesn’t happen very often and it’s much easier to design a dust hood around the smaller, non-sliding tool.
Cut the dust-hood sides from 1/2"-thick plywood, then connect them with the top, angled and back pieces cut from 1/4"-thick plywood. I used glue and 5/8"-long brads to secure the parts. The completed hood doesn’t need to be fastened to the top of your dust table. Mine works fine just sitting there. I’ve never found the need to finish workshop projects such as this. They work just fine without being sealed.
If the mitre saw isn’t the dirtiest power tool in the shop, then it has to be close to the top of the list. Plumes of fine sawdust spray off the blade with every cut, and I’ve never seen a factory-designed dust port that solved this problem, even when hooked up to a powerful vacuum. That’s why I designed a dust hood for my mitre-saw station–and it works quite well.
Start by placing your saw in its position on your cross-cutting station. Swivel it from side to side and chop it up and down to get a sense of its range of motion. The smallest hood dimensions will collect dust best, as long as there’s room to move the saw to various angle positions and capture dust as it sprays off while making mitre cuts. Non-sliding saws are easier to surround with a hood than sliders, and that’s one reason why I built my hood around this kind of saw.
If you’re having a hard time visualizing the shape of hood that’ll work best around your saw, build a mock-up using corrugated cardboard and hot-melt glue before committing the shape to plywood. Begin by building the overall hood with none of the cut-outs required for handles and other parts as the saw swivels and chops. You’ll find it easiest to customize the cut-outs by simply seeing where the saw touches the hood and where it needs to be trimmed back. And, remember, there’s no need to trim the hood to accommodate every possible angle you might adjust your saw to. One of the advantages of leaving the dust hood loose on top of your dust cabinet is that it can be lifted off or moved to one side easily for those occasional cuts that require the saw to be tilted to one extreme or another. If you’re anything like me, most of your cross cuts are at 90°.
Use glue and 5/8"-long brads to fasten the plywood hood’s parts to its sides. The joints are narrow where the hood top, angled piece and hood back meet. Apply glue to these connections, using masking tape and no nails to hold them together until the joints dry.
I like making things from scratch, but using metal tool cabinets in my workshop offers advantages I can’t pass up. They’re strong, rollable and the best models have drawers that slide effortlessly on ball-bearing glides. It would be hard to make a cabinet with the same features and capacity for much less money. That said, you still need to modify metal cabinets and add features to get the most from them in a wood shop. Each of the black cabinets in the mitre-saw station sit on a Delta universal rolling machine base. They’re designed to support stationary woodworking machines, but I assembled them with hardwood rails cut to suit these cabinets. I also used a step drill to bore holes in the bottom drawer front, so battery-charger power cords could exit without being pinched. I like to keep chargers on the go and out of the way, and putting them in a metal drawer eliminates any fire hazard if a charger malfunctions.
Rare-earth magnets hold the metal electrical outlet box anywhere that’s convenient on the side of the cabinet. A cable from this box plugs into a single wall outlet to energize the array of outlets on the box.
| Part | Material | Size (T x W x L*) | Qty. |
|---|
| Storage box sides | 3/4" x 17 1/2"xx | 4 | |
| Storage box top/bottom | 3/4" x 17 1/2" x 26 5/8"** | 4 | |
| Drawer sides | 1/2"-thick** | 4 | |
| Drawer front/back | 1/2"-thick** | 4 | |
| Drawer bottoms | 1/2"-thick** | 2 | |
| Drawer faces | 1/2"-thick** | 2 | |
| Fence bases | 3/4" x 2 1/2" x 32" | 2 | |
| Fence uprights | 3/4" x 2 3/8" x 32" | 2 | |
| Saw support surface | 3/4" x 31 5/8" x 31 5/8"** | 1 | |
| Hood sides | 1/2" x 12" x 21" | 2 | |
| Hood top | 1/4" x 11 3/4" x 21" | 1 | |
| Hood angled piece | 1/4" x 14 1/4" x 21" | 1 | |
| Hood back | 1/4" x 1 1/2" x 21" | 1 | |
| All wooden parts made from Baltic birch plywood **Adjust to suit your cabinets | |||
* Length indicates grain direction
Recommendations

canadianhomeworkshop.com is part of the Blue Ant Media
Canada Network
© 2025 Blue Ant Media
More information
Social Media & RSS


Our other sites


No comments
To leave a comment, please log in
Don't have an user account? Register for free