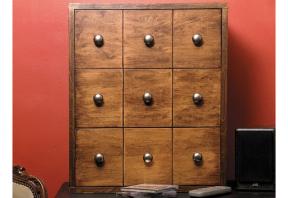
It isn’t easy to keep a CD collection in order. Without some kind of a system, the slippery plastic cases skid off shelves, crack or get lost, and clutter up desks and stereo cabinets. This compact CD cabinet solves the problem of music management: it can hold a whopping 300 discs, which should be more than enough capacity for all but the most obsessed collector. The design is easy to build-intermediate woodworkers should be able to make it over a weekend. The cabinet’s removeable drawer dividers allow you to use this project for other kinds of collections too.
Start by cutting all of the drawer box parts as listed on page 50. Start with the 6 1/4"-wide sides, fronts and backs. Three strips ripped from the length of an eight-foot sheet of veneered plywood will be just enough for the sides, fronts and backs. Cross-cut the sides, fronts and backs to length using a mitre saw or a cross-cut sled on a tablesaw. Once you have the 12 pieces cut, saw another piece of 6 1/4" stock down to five inches wide for the drawer dividers.
Next, prepare 1/2"-wide grooves for the dividers in the drawer boxes' front and back parts. A dado blade raised 1/4" above the top of a tablesaw is the easiest way to cut the grooves. Set the fence 5 1/8" from the blade to cut the divider grooves, then cut more grooves in the sides to hold the drawer bottoms. Use glue and 1 1/4" finishing nails to assemble all of the drawer components except the dividers and the solid-wood drawer fronts. Those come later.

When you're ready to make the cabinet itself, you have eight pieces to prepare: the sides, top, bottom, back and the three drawer fronts. As you work, keep in mind that for a good-looking finished piece, the wood grain should go around the sides, top and bottom of the cabinet in a continuous direction. I used iron-on edge banding to finish off the exposed plywood edges before assembly. The back doesn't have exposed edges, so it does not call for banding.
Use three #20 biscuits or 3/8"-dia. x 1 1/2"-long fluted dowels to join each corner of the cabinet body with glue and clamps.
Next, cut three drawer faces from 1x8 dressed maple, trimmed down to 7 1/4" wide by 18 5/16" long each. Cut thin-kerf slices partway through the surface of the drawer fronts to create the look of three separate fronts per drawer. Fine-tune the fit of the fronts within the cabinet, aiming for a 1/16" gap all around. I used scraps of melamine as spacers to help do this job.
To make the CDs at the back of the drawers easy to access, I used full-extension mechanical slides for the top two drawers and a full-extension bearing-guided glide for the bottom one. The glide costs more, but it doesn't require that the drawer tilt in order to remove it. That's worthwhile because you won't be able to tip the drawer up to remove it when the cabinet is sitting on the floor or a desk.
Once you're satisfied with the spacing of the drawers and their sliding action, attach the solid-wood drawer faces. Dig out the melamine spacers you used earlier to help with drawer-face spacing. You'll find that double-sided tape is useful for holding the fronts in place while you adjust their relative positions. When everything is in place, fasten the drawer faces permanently with four #8 x 1" screws driven from inside the drawer boxes. I installed the knobs on the drawer faces before securing them to the drawer boxes since the mounting screws were too short to go through both boxes and faces.
Take the drawers out of the cabinet now, marking their locations so you can put them back later. Sand everything with 180-grit paper, then apply a coat of dark walnut stain. After it's dry, sand lightly again with 220-grit paper, then apply another coat of stain. Let the second coat of stain dry for two days, then apply two coats of clear urethane, sanding between the first and second with more 220-grit paper to get rid of raised grain.
Fit the back panel in place, secured with metal L-brackets screwed to the inside surfaces. All you need to do now is decide whether you'll organize your CD collection by artist or genre.
| Part | Material | Size (T x W x L*) | Qty. |
|---|
| Cabinet sides | maple-veneered ply | 3/4" x 18" x 22" | 2 |
| Cabinet top/bottom | maple-veneered ply | 3/4" x 18" x 19 3/4" | 2 |
| Cabinet back | maple-veneered ply | 3/4" x 18 3/4" x 22" | 2 |
| Drawer faces | maple | 3/4" x 7 1/4" x 18 5/16" | 3 |
| Drawer fronts/backs/sides | birch-veneered ply | 1/2" x 6 1/4" x 16 3/8" | 12 |
| Drawer dividers | birch-veneered ply | 1/2" x 5 1/8" x 15 7/8" | 6 |
| Drawer bottoms | birch-veneered ply | 1/2" x 16" x 16 7/8" | 3 |
| Drawer pulls | antiqued nickel | 9 | |
| Drawer slides | 16" full extension | 2 | |
| Bottom drawer glide | bearing-guided | 16" full extension | 1 |
* Length indicates grain direction
Recommendations

canadianhomeworkshop.com is part of the Blue Ant Media
Canada Network
© 2024 Blue Ant Media
More information
Social Media & RSS


Our other sites


No comments
To leave a comment, please log in
Don't have an user account? Register for free