At the 2008 Canadian Home Workshop Show, I spoke to hundreds of workshoppers while building this cabinet in the Master’s Workshop venue; the most common question asked was how to use a cabinet scraper. It’s a classic tool that every woodworker should use, and one I used a lot in the building of this elegant cabinet. I dressed each component with a sharp cabinet scraper as it was completed; no sanding was required other than to round all sharp edges slightly with some 320-grit paper. See Cabinet scraper how-to for my scraper tips.
Begin by milling wood to 3/4" thickness for all parts except the top, panels and trim strips. The sides need four stiles (two per side), four rails and two bottom rails. Rip and cross cut these pieces to size, then mill centred 1/4"-wide x 3/8"-deep grooves to accept the panels. You can use either a dado blade or a 1/4"-diameter straight bit in a router. In the top rails, mill the groove in the bottom edge. The middle rails get a groove in both edges, and the bottom 31/4"-wide rail gets the groove in the top edge. Mill full-length grooves on the inside edges of the stiles, then, without changing your machine set-up, lay the rear stiles, inside face down, and mill another full-length groove on the inside rear face of the rear stiles to accept the back panel.
All of the rails have 1/4"-wide x 3/8"-long tenons on each end. You don't need to change the router bit or dado blade, just lower the cutter to 1/4" high. With a sacrificial backer board to reduce tearout, cut the first half of each tenon in two passes. Flip over the stock and repeat to create 1/4"-wide tenons.
Next, you need to cut the panels. Prepare four pieces of 1/4"-thick cherry plywood to 73/4" wide x 201/2" long, paying attention to ensure the grain direction runs along the part's length. Test-fit the parts, and once satisfied with the fit, it's time to drill holes for the shelf supports (LV #00S05.09). The ends of the shelf supports are 93/4" apart, which means you need to drill a vertical row of 3/8"-deep x 1/8"-diameter holes set 15/8" back from the inside edge on all four stiles. To ensure the holes line up, I made a hardboard template with holes spaced properly. I then clamped the template centred on the stiles and marked each hole with a centre punch to keep the bit from wandering when I start drilling. Once all hole locations are marked, attach a temporary fence to your drillpress table and bore all shelf-support holes.
Ensure that the two sides are mirror images of each other, with the back panel grooves located on the inside faces of the rear stiles. Place the stiles and rails on your bench and run a bead of glue along the grooves. With a small brush or stick, spread the glue inside the grooves so it's on all three surfaces, then insert the rails into one stile, slide the panels in, then attach the other stile. Clamp, check for square, then set the assembly aside to dry. Assemble the other side the same way.
For the bottom panel, cut a piece of 1/4"-thick plywood 111/4" wide x 24" long, and glue a 3/4" x 3/4" piece of cherry to the back edge. Once the glue is dry, level the solid-wood edging with neighbouring plywood using some sandpaper around a sanding block or a sharp hand plane. Mill another 1/4"-wide x 3/8"-deep groove in the top edge of the edging to accept the bottom edge of the rear panel.
Continue by making the front and rear top rails. The top back rail has a 1/4"-wide x 3/8"-deep groove cut into the bottom edge, and a 1/4"-thick x 3/8"-long tenon on each end. Mill this piece exactly the same way as the side rails. Finally, cut the last piece of 1/4"-thick cherry plywood to 243/4" wide x 451/4" long for the back panel. Test-fit the assembly and make any adjustments required. Put glue in the grooves and on the two ends of the plywood base and insert the plywood back panel into the bottom groove. Next, slide the side assemblies over the edges of the back panel, keeping the bottom of the sides flush with the bottom of the plywood. Install the front rail and clamp everything together, check for square, then allow the glue to dry.
After the entire cabinet is dry, you'll need to reinforce the joints between the bottom panel and the sides. I used four predrilled and countersunk #8 x 11/2" screws per side to reinforce these joints. Drill and drive the screws, making sure the holes are within 3/4" from the bottom edge, so the base will cover them later. Attach the front top rail permanently with a couple of pocket-hole screws per side, orienting the rail so the pocket holes are on the top face. The last thing you need to do is attach a 3/4" x 3/4" x 251/2" edging strip across the front edge of the bottom panel. Apply glue, and position so it is flush with the top surface of the ply and overlaps the front edges of the sides completely. Reinforce this joint with four #6 x 11/2"-long screws driven through from the front into predrilled and plug-covered holes.
The base is built to cradle the bottom of the cabinet on three sides, supporting the back of the cabinet completely on a solid strip. I found it easier to preassemble this base, then fasten the cabinet body to it later.
Begin by cutting the base front piece and two base side pieces to size according to the materials list. Mark and saw the decorative curves, then cut mitres on each end. I prepared these by tilting the blade on my tablesaw and using a mitre gauge to support the wood. This set-up also works for cutting spline grooves, if you need them. Move your wood to the other side of the tilted blade and lower it to cut a 1/8"-wide x 3/8"-deep groove in the centre of each mitre face.
Cut four 1/8" x 3/4" x 23/4" splines, insert them into the grooves in the base front with a little glue. Leave the splines protruding at each end, sanding them flush later. Next, apply a thin layer of glue to the mitre faces and spline grooves on the base sides as well as on the ends of the base rear piece. Assemble the four pieces, clamp, then check to make sure the assembly is square. Once the glue has dried, reinforce the corner joints by gluing and screwing four 2" x 2" triangular corner blocks in place. Position these blocks so they're located 3/4" from the top edge of the base. This arrangement creates a 3/4" lip to support the bottom of the cabinet as it sits in the base.
Apply a thin layer of glue on the front of the edging at the front of the cabinet, then slide the base in place and clamp it flush at the front and back. When the glue has dried, drill a 1/8" countersunk hole in the bottom of each of the corner blocks, and drive #8 x 11/4" screws up through the blocks and into the stiles and rails of the cabinet body.

If you're starting with 1"-thick rough lumber, keep the material for the top as thick as possible. A finished thickness of 7/8" is ideal, but you can go right down to 3/4" if necessary. Laminate enough stock to make the top 28" long x 141/2" wide, then glue and clamp it together. Once the glue has dried, trim the ends of the top to achieve a final length of 271/2", then mark and saw the curve for the front edge. Smooth this edge with either a hand plane or some 150-grit sandpaper wrapped around a sanding block.
To attach the top solidly yet still allow for seasonal wood movement, I drove three 11/4" panhead screws (with flat washers) driven into oversized holes through the front top rail and two more in each of the 3/4" x 3/4" cleats glued onto the side's top rails. By drilling the holes about 1/8" larger than the screw shanks, the wood can move, yet the screws hold the top down firmly.
The shelves are 101/2"-wide x 24"-long pieces of plywood with 1/8"-wide x 1/2"-deep grooves sawn into the ends to accept the shelf support wires. After these grooves are cut, cap the front edge of each shelf with a piece of solid cherry measuring 3/4" x 3/4" x 24". After assembly, trim the shelves to create 1/16" clearance with the cabinet.
The doors have a simple half-lap design and feature square pegs to help lock everything together. To start, cut four stiles and four rails, then install a 1"-wide dado blade in your tablesaw. With a sacrificial solid-wood fence in place to cover the unused portion of the blade, raise the blade to 1/2" and cut a 1/4"-wide rabbet along the inside edge of all eight pieces.
Without changing the blade height, use a stop block and your mitre gauge equipped with a sacrificial extension to cut the 21/4" half-laps in the ends of the back faces of the stiles by making multiple passes. Lower the blade to 1/4" and cut the 21/2" half-laps in the front faces of the rails. Check for fit, then glue up the two door frames and set them aside to dry. While you're waiting, mill 1/4"-thick x 3/8"-wide glazing strips to hold the glass in place.
Now is a good time to make the 1/4" x 1/4" decorative mullions. Each one fastens to the glass with a bead of caulking that sits in a 1/8"-wide x 1/16"-deep groove routed along the entire length. Use a table-mounted router and a fence with featherboards to support them while milling. While you're at it, make plenty of extra mullion stock in case some break during the next step.
The mullions interlock with more half-lap joints, but these ones are a little more finicky to cut because they're small. Cut mullion pieces to length, then lay them out on your bench and mark locations for the joints. Using a fine-tooth blade and a mitre gauge with a sacrificial fence in the tablesaw, raise the blade to 1/8" and nibble away at the material until the pieces interlock with minimal pressure.
The last step involves reinforcing your door corners with square pegs. Simply mark the centre of each half-lap corner joint, then drill a 5/8"-deep hole from the front with a 3/8" brad-point drill bit. With all eight holes drilled, square them up with either a 3/8"-wide chisel, or cheat by simply centring a 3/8" square chisel from a hollow-chisel mortiser over the hole and tapping it with a hammer. You'll get perfect squares every time–just make sure you remove the auger bit from the centre of the mortiser chisel first.
Plane cherry scrap into 3/8" x 3/8" strips, insert one end into each one of the door holes with a little bit of glue, trim the protruding piece off with a flush-cut saw and sand the pegs down until they're perfectly even.
Prefinish the doors, mullions and glazing strips now. It's much easier than doing it after the glass is in place.
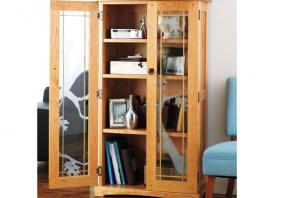
Have glass cut to fit the door openings at your local glass store. For an added touch, I sent my glass to an artist named Don Cain. He carved the inside face with an oak branch motif. Place the glass into the rabbets in the door frames, and hold each piece in with glazing strips. Apply the strips with 1/2" finishing nails only, so they can be removed easily, should a pane of glass ever need to be replaced.
With the glass installed, do the final fitting of the mullions. Secure them with a very fine bead of clear silicone laid into the 1/16" grooves milled into the mullions, then place them into position until the silicone sets. The grooves should prevent most squeeze-out, but any that does occur can be removed easily from the glass with a razor blade after it has fully cured.
For a simple, attractive finish, I chose three coats of Minwax tung oil applied over as many days. Once the finish is fully cured, rub the entire cabinet with #0000 steel wool, then apply two coats of paste wax buffed to a subtle sheen.
I chose simple, no-mortise hinges for the doors, and Brusso ball catches for door stops. I prefer these stops to the usual magnetic catches, although both will work. Place the shelf supports in position, slide the shelves into place and you're done.
All wood supplied by Century Mill.
| Part | Material | Size (T x W x L*) | Qty. |
|---|
The Body |
|||
|---|---|---|---|
| Top | cherry | 7/8" x 14 1/2" x 27 1/2" | 1 |
| Stiles | cherry | 3/4" x 2 1/2" x 47 3/4" | 4 |
| Mid/top rails | cherry | 3/4" x 2 1/2" x 7 3/4" | 4 |
| Bottom rails | cherry | 3/4" x 3 1/4" x 7 3/4" | 2 |
| Side panels | cherry ply | 1/4" x 7 3/4" x 20 1/2" | 4 |
| Back panel | cherry ply | 1/4" x 24 3/4" x 45 1/4" | 1 |
| Bottom planel | cherry ply | 3/4" x 11 1/4" x 24" | 1 |
| Bottom rear edging | cherry | 3/4" x 3/4" x 24" | 1 |
| Bottom front edging | cherry | 3/4" x 3/4" x 25 1/2" | 1 |
| Front top rail | cherry | 3/4" x 2 1/2" x 24" | 1 |
| Rear top rail | cherry | 3/4" x 2 1/2" x 24 3/4" | 1 |
| Top mounting cleats | cherry | 3/4" x 3/4" x 8 3/4" | 2 |
| Shelves | cherry ply | 3/4" x 10 1/2" x 24" | 4 |
| Shelf front edging | cherry | 3/4" x 3/4" x 24" | 4 |
The Doors |
|||
|---|---|---|---|
| Door stiles | cherry | 3/4" x 2 1/2" x 47" | 4 |
| Door rails Door rails | cherry | 3/4" x 2 1/2" x 12 3/4" | 4 |
| Long glazing strips | cherry | 1/4" x 3/8" x 41 1/2" | 4 |
| Short glazing strips | cherry | 1/4" x 3/8" x 8 1/4" 4 | 4 |
| Long mullions | cherry | 1/4" x 1/4" x 41 1/2" | 4 |
| Short mullions | cherry | 1/4" x 1/4" x 7 3/4" | 4 |
The Base |
|||
|---|---|---|---|
| Base front | cherry | 3/4" x 2 1/2" x 27" | 1 |
| Base sides | cherry | 3/4" x 2 1/2" x 13 1/2" | 2 |
| Base rear | cherry | 3/4" x 1 3/4" x 25 1/2" | 1 |
| Corner blocks | cherry | 3/4" x 2" x 2" | 4 |
* Length indicates grain direction
Recommendations

canadianhomeworkshop.com is part of the Blue Ant Media
Canada Network
© 2025 Blue Ant Media
More information
Social Media & RSS


Our other sites


No comments
To leave a comment, please log in
Don't have an user account? Register for free