Weekend DIY: Install a rain barrel
Green your garden and cut your water bill by collecting water runoff


I was watering my garden last weekend and, like I used to do as a kid, I took a sip of water straight from the hose. As cool and refreshing as it was–and there is something tasty about water from a rubber hose–I had a new thought: why am I wasting drinking water on my lawn and garden? Why not use the rain that’s been pouring down all summer?
I’d been meaning to install a rain barrel for a while, so visited a few hardware stores to see what’s out there. Home Depot had a few collapsible barrels made of UV-resistant vinyl in sizes from 200 to 400 litres and ranging in price from $79 to $120; Rona had a 252-litre wooden barrel with antifreeze protection for winter months; and Canadian Tire had a 205-litre barrel on sale for about $90.
What you get
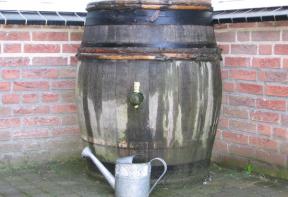
Prices range based on the size of the barrel and add-on features, such as mosquito netting, lids and various types of spigots and connectors. As with all tools, you get what you pay for, but don’t fret too much about differences; all rain barrels function in similar ways. Whether you want a collapsible barrel to put away in the fall, or a solid barrel with the added garden-worthy aesthetic of wood, in each case, the barrel kits all offered the same basic feature: the ability to harvest water from your gutters and downspouts.
As rain runs through the gutters, it is diverted to the tank, where it’s stored–make sure your barrel has a lid to prevent mosquito breeding–and ready to be used on your lawn and garden. Simply attach a hose and you’re ready to flow. Because the system depends on water pressure, elevation is key; raise the barrel a foot or two off the ground using cinder blocks (or any other sturdy base) so that it sits higher than the area you intend to water with the barrel. If you’re having difficulty conceiving how it works, imagine having a water barrel at the top of a hill and the hose at the bottom–this is what you’re aiming for.
Installing your rain barrel
Connecting to the downspout might require cutting the downspout and adding a flexible hose that connects the spout to the barrel. Homeowners can purchase special connective hardware for the downspout, based on size and usage (some come equipped with a switch so you can decide whether you want the water to run into the barrel or divert it away and down the regular downspout; also, make sure your barrel system has an overflow valve).
There’s really no downside to rain barrels. They can collect up to 90 per cent of rainfall on your roof without using any power to operate. Virtually maintenance-free, these products are truly green and help reduce your water bills. Some units allow you to hook up multiple barrels, perfect for larger yards. What’s more, some municipalities, such as Toronto, offer free barrels as a way to reduce and divert water.
Installation takes an hour or two. Because the barrels are quite heavy when full, a large patio stone or other support works well to keep the barrel from sinking into the ground.
To leave a comment, please log in


No comments