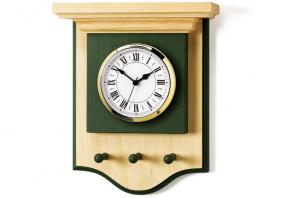
A perfect gift for a loved one, this wall clock will give you an opportunity to polish your skills as you make curved scrollsaw cuts and smooth router profiles. Thanks to the project’s small size, it is relatively inexpensive to build. You’ll find finishing easy too. A little stain or paint can really bring the details of this pine clock to life
Start by creating a tracing template from the scale diagram below; it will also help you form the back shape of the clock.
Measure and mark the dimensions on your stock for the back, front, top and trim pieces, double-checking your work. Use a tablesaw to cut each piece. Be sure to use a pushstick to move the smaller parts past the blade safely.
Next, trace the template you made onto the bottom end of the back piece. Use a scrollsaw or bandsaw to cut along the waste side of the line, then clean up the edge down to your tracing line with 120-grit sandpaper.

Measure seven inches down from the top edge to locate the centre of the middle wooden peg. The holes for the other pegs go 1 3/4" to each side of this one. Chuck a 1/4"-diameter brad-point bit in your drill and create three peg holes, each one 3/8" deep. You'll install the wooden pegs later. Right now, use a table-mounted router to mill 1/4"-rad. roundover profiles along the sides and bottom of the clock back. You'll also need to mill an ogee profile on the front and ends of the trim, and a 1/4" cove around three sides of the top.
Centre the top onto the back, positioning the rear edges flush, then apply two countersunk #6 x 1 1/4" screws to secure the joint. Use glue and clamps to secure the trim first, then butt the front piece up tight against it.
When the glue has dried, mark the centre of the front piece. This is the middle of the clock hole. Use either a Forstner bit, scrollsaw, hole saw or circle cutter mounted in your drillpress to create the 2 3/8"-diameter hole through the front and back pieces. I purchased my clock movement from Kidder Klock.
To finish, brush on two coats of either paint or stain. When the clock is dry, place a spot of glue into each peg hole, insert the pegs, then install the clock movement. Add picture-hanging hardware to the back of the project and it can be hung up for admiring eyes.
| Part | Material | Size (T x W x L*) | Qty. |
|---|
| Back | pine | 3/4" x 7" x 9" | 1 |
| Front | pine | 3/4" x 5" x 5" | 1 |
| Top | pine | 3/4" x 2 1/2" x 8" | 1 |
| Trim | pine | 3/4" x 1 3/8" x 6 1/4" | 1 |
| Wooden pegs | pine | 1 3/4" - long, Shaker-style | 3 |
| Clock movement | Kidder Klock #70-1181-00 | 1 | |
| Screws | #6 x 1 1/4" | 2 | |
* Length indicates grain direction
Recommendations

canadianhomeworkshop.com is part of the Blue Ant Media
Canada Network
© 2024 Blue Ant Media
More information
Social Media & RSS


Our other sites


No comments
To leave a comment, please log in
Don't have an user account? Register for free