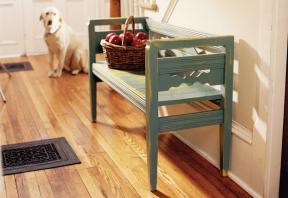
From 1891 to the beginning of World War I, many Ukrainians took advantage of a Canadian government program designed to populate the Western provinces. Escaping cultural persecution and economic repression, the new settlers brought agricultural and manufacturing skills, and they applied them fervently in the new land. Favouring a “peasant baroque” style, early Ukrainian-Canadian woodworkers enjoyed ornamenting their pieces with both carvings and painted icons, often religious or political, and multi-colour finishes. This Ukrainian bench, collected in Saskatchewan, features a whimsical back that shows the joy that went into building the piece.
I reproduced this decorative little hall bench from a very grainy photo. Because I knew only the outer dimensions of the piece, I spent a lot of time adjusting the size of the pieces to come up with the right proportions. Some elements of the finished product vary slightly from the original, but the result is a comfortable, functional piece, perfect for the front hall.
To test how the piece would look as a whole, I built a full-size mock-up from scraps before I started on the real thing. That let me sit down and try it out to get a sense of how the finished project would feel. The mock-up also allowed me to adjust sizes of the individual parts to replicate the original more closely.
I chose #2 kiln-dried white pine because it's inexpensive, easily available in my part of the country and a pleasure to work with. The original bench was probably made with pine as well, although early Ukrainian furniture was often made with spruce, birch, fir or poplar.
Since most of the bench parts are small, you can cut around many of the knots, substantially upgrading the quality of lumber that actually makes it into your project. I milled the legs and arms from 2" x 2" stock planed down to 1 3/4" square. This allows sufficient dimensions for the joinery while making the legs look slender. I tried 2" x 2" stock originally, but found it looked too thick. The reeded rail pieces are dressed from one-inch rough stock, finished down to 7/8" x 2 3/4". Don't use conventional 3/4" wood here if you're building from pine. The extra thickness adds necessary strength to these high-stress components. Prepare pieces for the arms, legs and reeded rails now, leaving some waste wood beyond the dimensions listed.

Cut all four legs to a finished length of 27", then taper each one so the bottom ends are 1 3/8" x 1 3/8". Apply these tapers to each side of the legs, beginning 10" up from the floor. You can use a taper jig on a tablesaw or bandsaw to cut these, but there's another option too. If you mark out the taper with pencil ahead of time, a sharp hand plane will make quick work of the job.
You'll need a 3/32" bullnose router bit to create the reeded details on the rails. You'll also need a table-mounted router with an extra-high fence to support the stock as it's milled on edge. I also strongly suggest the use of feather boards to keep the work tight against the fence and table. Without these, any tiny movement will cause unsightly ripples in the reeding. Prepare some scrap wood to the same dimensions as your rails. You'll need these to arrive at critical machine adjustments.
As you rout the reeding, you'll need to change the bullnose cutter height to create the adjacent bullnose profiles. Start by adjusting the bit so the top edge of its curved profile is one inch above the table. Run the rail pieces through on both long edges, then shut down and unplug your router. Next, lower the cutter so the bottom edge of the profile you just milled is aligned perfectly with the top edge of the cutter in its new, lower position. Precise height adjustment here is critical too, and that's where your scrap piece of wood comes in. When you think you have the bullnose bit height spot-on, try it on your scrap just to be sure. When it looks right, run your rail pieces through again, on both long edges as before.
The side and back scroll pieces are decorative, so make them from 3/8"-thick wood. You can draw the shaped profiles on graph paper following the grid diagram on next page, (you can download a full-size template). Print multiple copies, glue one to each piece of wood using rubber cement, then saw along the outline before you remove the paper. You may need to do some sanding to remove the glue and paper residue afterward.
Next come the seat slats. Mill them to their final size: 7/8" x 3 7/8" x 13 7/8", then prepare 3/8" x 7/16" rabbets on both long edges. You'll find a table-mounted router is an excellent tool for these rabbets, although you could use a tablesaw too. The seat slats rest on seat support strips applied to the inside surfaces of the front and back rails. Prepare these supports now, making them 7/8" x 7/8" x 39 3/4".

Aside from being tapered, the legs also include a number of mortises. These support tenons on the ends of the side, front and back rails, as well as the arms. The plans show all critical dimensions for mortise size and location, but a few tips will help. The uppermost mortises on all four legs support the arms. Note that the mortises for the front legs must only be 1 1/4" deep, allowing room for shaping the top of the front legs.
When you've cut mortises in the legs, it's time to cut matching tenons. As with any project that supports substantial weight, tight joinery is essential for strength. That's why you need to take your time to get a snug fit between mortises and tenons. I find it easiest to cut tenons like these on the tablesaw, using a mitre gauge with an extra-high fence to define the shoulders. The majority of the tenons are 1/2"-thick x 2"-tall x 1 1/2"-long, except for the tenons on the arms. These are only one inch tall. The tenons on the back of the arms are 1 1/2" long; those on the front are 1 1/4" long to fit the shallow mortises that allow for the front leg's curved shape.
The only other complication is the tenons on the top back rail. Left on their own, these will interfere with the arm tenons. That's why you need to notch them so the tenons interlock within the legs.
With your mortise-and-tenon joints cut, bring the parts together for a test run without glue. Start by assembling the side rails and arms. I laid these out on a piece of carpet on my shop floor, then inserted the back rails and seat rails into the side section. Next, cap off the rails with the other preassembled side components. Carefully roll the bench onto its legs and draw the joints tight with clamps. Turn the bench onto its back again, then place the scrolled cutouts directly onto the top and mid-back rails, centred on their edges.
The plans show how the decorative side and back scroll pieces fit into small notches. These are 1/4" deep, located in the legs, top back rail and mid-back rail. Mark these now, then take everything apart, cut the notches, and get ready for final assembly.
Smooth all surfaces with 120-grit sandpaper to remove mill marks and dents, then apply glue to the tenons of the side rails and arms, as well as their matching mortises in the legs. Clamp the two side assemblies just as you did in the dry-fitting phase, then set them aside to dry. While you're waiting for the glue to harden, mill small chamfers on the edges of the seat slats.
Let the sides dry overnight, then pull them out of the clamps and prepare the small scallop shapes on the top of the front legs. They extend 1 5/8" down from the top ends of the legs and are 3/16" deep. You can make this cut with a bandsaw or scrollsaw, then clean up the surface with a 150-grit belt in a handheld sander. Glue and clamp the long rails into the side pieces, then clamp the whole arrangement together. The main frame of your bench is now complete.
The seat slats are supported on strips of wood glued to the inside surface of the front and back rails, 1 1/16" down from their top edges. This positioning allows the seat surface to rise 1/16" proud of the seat rails after they're installed.
Begin by marking the centre of the seat rails area. This should be 19 7/8" from the inside edge of the legs, but double-check by measuring in both directions. When you've found the true centre on your bench, place one seat slat centred on this line. Drill and counterbore for a single, plug-covered #8 x 1 1/2" woodscrew on each end of the slat, then repeat with the other slats.
Proceed outward from the middle, making sure to leave a 1/16" space between all the slats to allow for seasonal movement in the wood. By starting from the centre like this, you end up with the slats being the same width on both outer sides. As you work, you'll find the rabbeted edges interlock shiplap-style. All you need to do is saw off the rabbet on the outer edges of the outer slats, then create a small notch to accommodate the legs.

The next step covers detailing the arms and legs. The top surface of the arms includes a 1/4"-tall crowned edge. I made this by drawing lines 1/4" down from the top on both sides of each arm, with a centre line along the top. Next, I used a sharp block plane to remove wood in a rounded shape, planing in from both directions to avoid causing splinters on the tops of the legs. With this rough shaping done, sand the crowned surfaces smooth using 120-grit paper in a palm or random-orbit sander. The legs also need a 1/8" radius on all remaining corners. All that's left now is a final hand-sanding with some 180-grit paper.
Since this bench is a reproduction of a late 1800s original, I chose a layered, rubbed paint technique for final finishing. The technique is fairly simple and can be achieved in a day and a half from start to finish.
After choosing your colours, brush on the base coat. I used Benjamin-Moore pearl finish latex in a yellow colour. I let this base coat dry overnight and the following day, then gave the whole bench a thorough sanding with 180-grit paper. Don't worry if you sand through the paint at this stage, just try to get the bench as smooth as possible.
Next, brush on the topcoat. Again I used Benjamin-Moore pearl latex, but this time in blue. When this paint starts to dry, take a damp cloth and scrub areas that would normally receive lots of wear. Work through the blue paint down to the yellow, rinsing your cloth frequently. For a realistic look, avoid rubbing inside corners or anywhere else that wouldn't normally wear. When you're satisfied with the results, let things dry for a few hours, then take some 220-grit paper and polish some of the sharper edges off to expose a little bare wood. Give the bench added protection with a coat of furniture paste wax.
| Part | Material | Size (T x W x L*) | Qty. |
|---|
| Legs | white pine | 1 3/4" x 1 3/4" x 27" | 4 |
| Arms | white pine | 1 3/4" x 1 3/4" x 15 3/4" | 2 |
| Side rails | white pine | 7/8" x 2 3/4" x 16" | 4 |
| Front/back rails | white pine | 7/8" x 2 3/4" x 42 3/4" | 4 |
| Seat support strips | white pine | 7/8" x 7/8" x 39 3/4" | 2 |
| Side scroll pieces | 3/8" x 3 x 13 1/2" | 2 | |
| Back scroll piece | white pine | 3/8" x 3 1/4" x 20" | 1 |
* Length indicates grain direction
Recommendations

canadianhomeworkshop.com is part of the Blue Ant Media
Canada Network
© 2025 Blue Ant Media
More information
Social Media & RSS


Our other sites


No comments
To leave a comment, please log in
Don't have an user account? Register for free