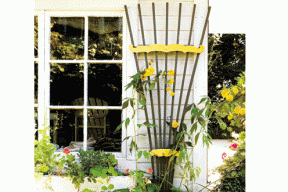
The trellis is one of those simple ideas that has managed to endure through hundreds of years of constant reinvention. That’s because trellises are often essential. Gardeners delight in beautiful plants whose only failure is that they just can’t stand up for themselves. Morning glory, trumpet vine, ivy and others need to drape upon and curl around something that leads them to their place in the sun. A trellis is an essential support structure for these beautiful climbers, and this one has a couple of unique features.
First off, the design is collapsible. When the garden turns barren in winter, just loosen a couple of bolts, swivel a couple of parts and the trellis’s bent slats come together for compact storage. Another great feature is the optional base holster. The copper pipes make it easy for you to drive the holster into the soil, then slide the trellis in place. You can then easily move it whenever you want. The holster also extends the wooden base of the trellis up and away from the rot-promoting damp soil. I also added a bit of Victorian flair to the crosspieces by giving them a unique profile.
Start with several lengths of 1x6 white pine that is clear or as knotfree as you can find. A knot in the wrong place will cause your slat to break instead of bend during assembly. But before you begin, get out a pencil.
At a casual glance, it doesn’t seem that it would matter which way around the slats are oriented on the trellis. After all, they’re square in cross section, right? But the slats will bend more evenly and look better if they’re arranged in the same orientation they were sawn off the board. That’s why you should draw a line completely across the butt end of the boards before sawing. Line up all the marks on your cut slats, and they’ll be reunited. You should also number each slat for positioning. Put the most knot-free slats on the outside, where the greatest amount of bending will occur.
Rip enough 3⁄4" x 3⁄4" slats on your tablesaw to give you seven good ones, with one or two extra as your boards allow.
Since this isn’t fine furniture, a light sanding with medium-grit paper on the slats is all you need. Just take the roughness off the saw cuts, without changing the dimensions of the slats. If you’re planning to paint or stain your trellis, do it now while the parts are unattached.
Use two 1⁄4"-diameter x 6" hexhead bolts to hold the slatted base of the trellis together. Galvanized is good; stainless steel is even better. These bolts run through all of the slats in two places: 2" and 10"up from the bottom end. Drill through the slats with a 1/4" spade bit. (Group the parts and clamp them together if your equipment allows.) The listed bolts will be a little longer than needed; just cut off the excess with a hacksaw after final assembly.
Cut the long and short spacers to size, then fit them between and below the bolts.
Next, prepare four crosspieces. They work in identical pairs, along with dowels, to sandwich the slats together and push them into their fanned-out positions. You can also take the sandwiches apart to collapse the slats for easier off-season storage. I added scrollwork to the two front crosspieces. To add this detail, use the plans provided to create a fullsize template. Attach the template to your stock and cut out the scrollwork using a jigsaw or scrollsaw.
The slats bend around the dowels, which fit into holes drilled into the back pieces. The central slat runs straight up and down, secured with a bolt that links the front and back crosspieces. Clamp the slats sandwiched in between the top front and back crosspieces. Drill a 3⁄16"-diameter hole through the centre slat, 16" down from its top end. This is where you’ll install the 3⁄16"-diameter x 21⁄2"-long bolt, washers and nuts that will bind the crosspieces and the centre slat together.
Drill 1⁄4"-diameter x 1⁄2"-deep holes in the top back crosspiece to accommodate the six crosspiece dowels. The plans show exactly where. Cut six 1" lengths of 1⁄4"-diameter dowel, put a small drop of waterproof glue on one end of each, then tap the dowel into place in the holes in the top back crosspiece.
Before you secure the bolt, install the dowels in the crosspieces and the mating holes in the slats that work together to splay the slats outwards. The slat holes won’t be equal distances from the ends of the slats because you’re aiming to create a fan-shaped structure. Using a 5⁄16" spade bit, drill holes 1⁄2" deep into the back faces of the slats. The plans show exactly where.
Next, work on the bottom crosspiece assembly. You’ll need to install dowels here as well, but only two. They define the spot where the slats start to splay outward on their way up, acting as bookends to keep the slats together. Just drill a single hole through the crosspiece assembly and the middle slat, 33" up from the bottom end of the slats. Join the front and back crosspieces with a 3⁄16" x 21⁄2" bolt, washers and nut.
Trellises are usually mounted to a wall permanently, but this one’s different. The holster at the base lets you easily take the trellis down for winter. The holster is made of two pieces of 1⁄2"-thick plywood and 24" to 36" lengths of 3⁄4" copper pipe, all bolted together with 1⁄4" x 21⁄2" bolts. The copper discourages slugs from climbing up the trellis; the pipe can be pushed or dug into the ground for support. Spacers on each side of the trellis fill out the space between the holster’s pipes, creating a close fit that’s less prone to movement.
Cut the holster front and back pieces from 8" x 13" pieces of 1⁄2" exterior ply. There’s no bottom piece, so rainwater won’t get trapped at the bottom. Instead, the trellis bottom rests on two bolts installed through holes 1" up from the holster base. The sides of the plywood sandwich are drilled 3" and 9" from the bottom, and 1⁄2" in from the edges. Drill through the copper 3" and 9" from the top, so the holes in the plywood and pipes will align. Just remember, when assembling the holster, don’t over-tighten the bolts. The copper pipe might get crushed, making it impossible to slip the trellis in place again.
With the aid of a green thumb, your garden will have a new, vertical dimension for plants that just can’t go it alone.
| Part | Material | Size (T x W x L*) | Qty. |
|---|
| Slats | Clear white pine | 3/4" x 3/4" x 72" | 7 |
| Top back crosspiece | Clear white pine | 3/4" x 1 1/4" x 24" | 1 |
| Bottom back crosspiece | Clear white pine | 3/4" x 1 1/4" x 10" | 1 |
| Top front crosspiece | Clear white pine | 3/4" x 3" x 25" | 1 |
| Bottom front crosspiece | Clear white pine | 3/4" x 2 1/2" x 12" | 1 |
| Top crosspiece dowels | Hardwood dowel | 1/4"-dia. x 1" | 6 |
| Bottom crosspiece dowel | Hardwood dowel | 1/4"-dia. x 1 1/4" | 2 |
| Holster front/back | Exterior ply | 1/2" x 8" x 13" | 2 |
| Short spacers | Plywood | 1/2" x 3/4" x 1 1/2" | 2 |
| Long spacers | Plywood | 1/2" x 3/4" x 6" | 2 |
| Holster uprights | Copper pipe | 3/4"-dia. x 36" | 2 |
| Bolt | 1/4" x 6" | 2 | |
| Bolt | 1/4" x 2 1/2" | 6 | |
| Bolt | 3/16" x 2 1/2" | 2 | |
* Length indicates grain direction
Recommendations

canadianhomeworkshop.com is part of the Blue Ant Media
Canada Network
© 2024 Blue Ant Media
More information
Social Media & RSS


Our other sites


No comments
To leave a comment, please log in
Don't have an user account? Register for free