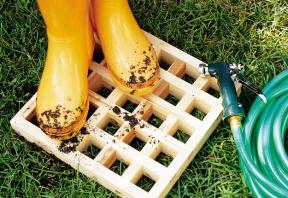
Cleaning garden mud from your boots is a tedious task that can be made easy with this handy boot-washing grate. Keep the grate outside, near your door – it’ll be poised for the mud-footed to stand on and hose dirt off without standing in the runoff, because the sluice drains through the grating. Even when your boots don’t require a bath, leave the grate just outside the door so you can wipe off debris on the way inside.
To complete your grate, you need 12 pieces of 3/4″ x 11/2″ stock cut 12″ long. While I used pine, you could select pressure-treated wood or even a species that’s naturally resilient to the elements, such as teak. Due to the number of lap joints involved, these pieces should be free of twists and warping, so buy straight stock.
I machined my parts from scrap 1x2 rough pine, then planed it down to the right width and thickness. When you have your stock cut to these dimensions, cross cut the material to 12" long. Set up a stop block on a compound mitre saw to regulate length and you'll get consistent part sizes without remeasuring. You could achieve the same consistency using your tablesaw with a stop block attached to an auxiliary mitre fence.
While you're sawing, cut a few spare pieces: you will need at least one for trial cuts later on, and it doesn't hurt to have a couple of extras on hand in case a part needs to be substituted because of a building error. Consistency is important, even with spares, so plan on fully completing each operation before changing your set-up for the next phase of work.

This project uses notches to connect the grate. To ensure consistent results, I used a finger-joint jig with my tablesaw (see April 2005, “In Good Hands,” p. 20) to complete all the notch cuts. The work goes best with a 3/4"-dado blade installed in your saw. Make a trial cut in a piece of scrap and test the fit with the parts you cut earlier. They should fit snugly, but not so tight as to require a mallet to force the pieces together. Make any adjustments to your dado blade thickness and height, possibly with some additional shims, until you are satisfied with the results.
Next, turn your attention to the finger-joint jig. The spacing between notch cuts is 11/2". The spacing between the jig pin and the blade is crucial. Make your first cut at the edge of one rail, so the pin isn't involved. In other words, you're making a 3/4" x 3/4" notch in the end of the rail. Now move your workpiece over so it straddles the pin, then make your next cut. If the jig is adjusted properly, this cut will be 11/2" from the inside edge of the first one. Continue until you have all six cuts completed: four in the middle and one on each end.
Repeat on the remaining 11 rails, plus a few spares. All rails are exactly the same-their positions are interchangeable.
With all of your pieces cut, dry-fit your grate. If any rails are too tight, a pass over a belt sander or some finessing with a hand plane should make the troublesome rail fit. Glued joints would create a strong grate, but considering the fact that you'll be standing on the project, and that even weatherproof glue isn't recommended for soaking in water, I elected to use screws. Galvanized, brass or stainless-steel screws will weather the intended use. I chose the #8 x 11/4" size.
If you're going to apply a finish, such as a penetrating oil, do it now, before assembly. The job is much easier at this stage since there are lots of small corners to deal with.
Assemble the project, using clamps in the corners to keep the rails together while you work.
Don't be tempted to drive in screws before predrilling holes. The rail parts are narrow, and many of the screws will be close to the edge. Without predrilling, your wood will split. I used a 3/32" bit to make pilot holes for the screw threads, and a 5/32" bit to make room for the main body of each screw.
With the project assembled, give the top edges a touch with a belt sander to smooth over any variances in height and smooth the end joints as well. Retouch your finish after this.
This grate was intended for boot washing, but I have also found it useful at the hose bib (there always seems to be mud there), and it could be resized to span an area of deck that would normally block light to a basement window. If you choose the design for a poolside shower, tighten the spacing to 3/4", a more comfortable grid for bare feet.
| Part | Material | Size (T x W x L*) | Qty. |
|---|
| Rails | pine | 3/4" x 1 1/2" x 12" | 12 |
| Screws | stainless steel | #8 x 1 1/4" | 3 |
* Length indicates grain direction
Recommendations

canadianhomeworkshop.com is part of the Blue Ant Media
Canada Network
© 2024 Blue Ant Media
More information
Social Media & RSS


Our other sites


No comments
To leave a comment, please log in
Don't have an user account? Register for free