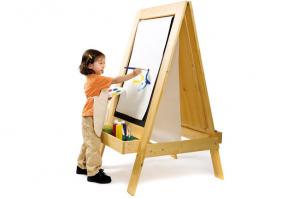
My nieces are big on colouring, painting and crafts, as most kids are. But whenever I visit them, I notice that their crayons and markers end up everywhere. I find them under seat cushions and behind furniture. I’ve found out the hard way that stepping on stray markers is almost as bad as stepping on Lego. So, as a gift to both Sarah, a four-year-old budding artist, and to my sister, who has to tidy up, I built this everything-in-its-place art easel. It’s perfect for creative minds, tight gift-making schedules and craft-frazzled parents.
I designed this project around paper and storage supplies I found in chain stores. The paper roll comes from Ikea, and its dimensions determined the width of the project. I also bought some colourful plastic storage bins with lids. These determined the size of the supply trays. To make things even simpler, I also used standard 1x4s throughout. These materials are easy to find, so I’m confident that you can make this inexpensive project in just one weekend.
Start by cutting all parts to the sizes listed in the box on the next page. When you've finished that, I recommend you apply one coat of finish, such as a water-based polyurethane, to all the wood components. It's easier to do that now than when you have all the parts together.
Once the finish is dry, start assembling the basic frames. These consist of two pairs of legs and two pairs of rails. Take a look at the plans and you'll see that they form a simple kind of stile-and-rail construction, using #20 biscuits at the corners. But before you cut biscuit slots, saw a 75º chamfer on the lower back edges of the bottom rail for each frame. Apply glue to the biscuit slots, add biscuits, then use bar clamps to pull the parts together. Let the two frames dry overnight.
The hinges come next. When the frames are dry, place them face down on your workbench, with tops butting together so you can connect them with a pair of three-inch hinges. When you have the hinges attached, the basic easel structure is complete. Now it's time to move on to the trays.

The entire easel sits at a 15º angle from plumb, so when you're building the supply trays, you need to cut the tray end pieces at a 75º angle. This allows the trays to sit level when the easel is open.
Join the tray components with #20 biscuits and glue, then fit them into place from the inside. Predrill and drive screws through the flanges on the ends of the tray and into the legs using #8 x 1 1/4" wood screws with cup washers.
A big roll of paper is an essential part of my easel for Sarah, because I know she loves to draw and draw and draw. You can substitute chains or chest lid hardware for the crossbars and dowels if a roll of paper isn't necessary for your version of the project.
Cut the crossbars to length, making a 15º angle on each end. You can reuse these angled off-cuts to make mounting blocks. Screw these blocks to the easel legs, positioned so they are flush with the outside edges of the legs.
Drill pilot holes for the #10 x 2" bolts and wing nuts that secure the crossbars. These not only allow you to remove the paper roll easily, but they also make it easy to fold up the easel.
Drill a 3/8"-deep x 1"-dia. hole in each crossbar, 5 1/2" from one end. Bore a second hole of the same size across the centre of just one of the crossbars. You'll fasten the paper roll block to the other side, as you'll see.
There are two dowels on this project. One gets glued and screwed in place for stability, the other is free-floating to allow replacement of the paper roll. Cut the stabilizing dowel first, making sure you have a snug fit between the crossbars. Drill pilot holes in the ends of this dowel for #8 x 2" screws (with cup washers), then glue and screw it in place between the crossbars.
Now it's time to cut the paper roll dowel to length by measuring the span between the crossbars, then adding the depth of the one central hole you drilled earlier. Cut the dowel just long enough to pull out from the crossbars without binding. The free end of the dowel is supported by the removable paper roll block. When you want to install a new roll, undo the #10 x 2" bolts and wing nuts that hold the block in place. Lift it up, pull the roll dowel out, add the new paper, then bolt it all back up again.
For the young multimedia artist on your holiday list, this project offers a choice of paper, blackboard or whiteboard “canvases.” To keep things simple, I applied two coats of chalkboard paint to a piece of 1/2" ply. I also anchored a piece of whiteboard to 1/2"-thick plywood backing using strong, double-sided tape. Use #8 x 1" screws to secure both boards to the back face of the easel frames. Just remember to leave the blackboard 1/4" down from the top rail so the paper can be fed from the roll and through the slot.
If you want to get fancy, you could recess the blackboard and whiteboard panels into rabbets cut in the frames. If not, secure them with screws only.
Load up the paper roll, crack open a new box of markers, call in the kids and watch their parents smile. Besides bringing hours of joy to the little ones, a bit of quiet time for the adults might just be the best gift you can give.
| Part | Material | Size (T x W x L*) | Qty. |
|---|
| Legs | pine | 3/4" x 3 3/8" x 54" | 4 |
| Rails | pine | 3/4" x 3 3/8" x 21 1/4" | 4 |
| Tray ends | pine | 3/4" x 3 3/8" x 5 1/2" | 4 |
| Tray fronts | pine | 3/4" x 3 3/8" x 21 1/4" | 2 |
| Tray backs | pine | 3/4" x 3 3/8" x 25" | 2 |
| Tray bottoms | pine | 3/4" x 3 3/4" x 20 3/4" | 2 |
| Crossbars | pine | 3/4" x 3 3/8" x 25 1/2" | 2 |
| Mounting blocks | pine | 3/4" x 1 3/4" x 3 3/8" | 4 |
| Paper roll block | pine | 3/4" x 3 3/8" x 3 3/8" | 1 |
| Dowels | hardwood | 1"-dia. x 28" | 2 |
| Blackboard | plywood | 1/2" x 24" x 36" | 1 |
| Whiteboard | whiteboard | 24" x 36" | 1 |
| Whiteboard backing | plywood | 1/2" x 24" x 36" | 1 |
| Paper roll | 18"-wide (Ikea) | 1 | |
| Bolts | #10 x 2" with wig nuts/cup washers | 8 | |
| Storage bins | (Ikea) | 3 | |
* Length indicates grain direction
Recommendations

canadianhomeworkshop.com is part of the Blue Ant Media
Canada Network
© 2024 Blue Ant Media
More information
Social Media & RSS


Our other sites


No comments
To leave a comment, please log in
Don't have an user account? Register for free