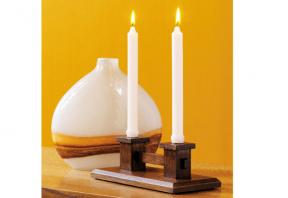
The care and attention that goes into creating a functional and attractive piece of woodwork relates to the fundamental ideals of the Arts and Crafts movement. Because of the small size of its parts, this candlestick holder can be made entirely with hand tools, true to Mission style’s founding principles.
If you’ve been holding on to off-cuts of quartersawn oak, dig them out for this project. The base of my holder is 10 1/4″ long, but you can customize the dimensions to suit the stock you have on hand.
Because I often make little projects such as this in multiples to give as gifts, I try to simplify construction so I can make them quickly. The most difficult element in making this candlestick holder is what appears to be through-mortise-and-tenon detailing. There’s a trick, though. The rail connecting the two uprights sits in shallow mortises, and the chamfered “ends” of the rail are actually separate pieces that also sit in shallow mortises on the opposite sides of the uprights.
Time
1 Day
Skill
2
Cost
1
Begin by making the base. It's nothing more than a flat board-3/4" thick, 5" wide and 10 1/4" long. Once you've cut it to size, mill a chamfer on the upper edges. I recommend either a router equipped with a bearing-guided chamfering bit, a tablesaw or a block plane to make this detail.
The uprights that hold the candlesticks are made of 1 1/2" x 1 1/2" stock. Cut each piece 2 1/4" long. If you're using quartersawn stock, orient the uprights so the quartersawn faces are parallel to the long sides of the base. Make the appearance even better by gluing 1/8"-thick, shop-made veneer cut from quartersawn stock to the flatsawn faces of the uprights before you cut them to final dimensions. This way you'll have quartersawn figure all the way around your candleholder.

Begin preparing the mortises by carefully marking their locations on opposite sides of the uprights. Use a sharp pencil and a combination square for this task.
Cut the mortises to a uniform depth of 1/4" deep, 1/2" long and 1/4" wide. Use a drill bit to remove the centre portion of the mortise, then use a sharp chisel to square up the corners. Be careful to keep the alignment of the mortises consistent from one side of each upright to the other. Any obvious offset will give away the false nature of the joint.
To make the caps for the tops of the uprights, simply cut two squares of stock 2" x 2" and 3/8" thick. No joinery is required here. Simply use wood glue to attach the caps, centred on the uprights. Clamps will tend to slide around a bit, so don't bother. I simply set each one upside down and put a little weight on top until the glue dries.
Next, cut the tenons, both real and decorative. To work such small pieces safely, it's best if you make the rail with tenons on the ends all one piece, then cut away the two ends that will ultimately extend from the outer faces of the uprights. Begin with a piece of rail stock 1/2" x 3/4". Cut it 8" or 10" long, then raise the tablesaw blade 1/8" above the table to make the tenon shoulders, as shown in the plans. Once the blade height is adjusted properly, cut off the test tenon and make the real thing. A regular cross-cut blade in your tablesaw is sufficient for nibbling away at the shoulders. Just be sure to use a zero-clearance throat plate to minimize wood tearout.
You'll get the best results if you fasten a scrap plywood support strip to your mitre gauge, then clamp a small stop block to this auxiliary fence. This block controls the location of the tenon shoulders. In this case, there are two shoulders per tenon: an outer one and an inner one. Simply butt the end of the rail against the stop block, then pass each face over the blade until you have a groove that goes all the way around. Flip your rail end for end, and repeat. When both inner and outer shoulders are complete, remove the wood in between with multiple passes of the saw blade. The distance between inner shoulders should be 4".
Use a stationary belt sander, block plane or disc sander to chamfer the outer ends of the tenons. These are the decorative stubs that fasten to the outside faces of the uprights. After the chamfers are cut, saw the end pieces off the main rail, preserving the all-important false tenons, of course.
Metal candleholder cups are available from hardware stores, but I made the ones you see here from 1" copper pipe caps, available in the plumbing aisle. With a little tweaking, these are about the right size for many types of tapered candles, and they look great.
Bore a 1"-diameter, flat-bottomed hole into the centre of each capped upright using a Forstner bit chucked into a drillpress. Make sure the hole depth matches the length of copper pipe caps you have. Next, bore a 1/8"-diameter hole in the bottom of each pipe cap and countersink it for a #5 or #6 screw. I gently used a ball-peen hammer to distress the upper edge of the pipe cap, giving it a hand-crafted look that disguises its humble origins.
Now your candlestick parts are ready to be assembled. Finish-sand all of the parts with 220-grit paper, then remove the dust with a tack cloth or shop vac. Glue the uprights and centre rail together. To ensure they remain in proper alignment, lightly clamp the uprights to a straight board that runs parallel to the rail and set the assembly on a flat surface while it dries. After the centre rail is fixed, glue the false-tenon ends into their mortises. Finish up by attaching the upright and rail assembly to the base. You can use dowels, or glue and #8 x 1 1/2" screws, for this joint.
A project this small made from white oak is suitable for ammonia fuming, the traditional Mission method of imparting a rich, brown colour. The process involves exposing the wood to ammonia gas in a sealed space. A plastic storage tote will do just fine for a project this size. Alternatively, brush on your favourite Mission finish. After finishing, apply either felt, cork or rubber to the underside of the base of the candleholder to avoid scratching your other fine Mission furniture.
| Part | Material | Size (T x W x L*) | Qty. |
|---|
| Base | quartersawn white oak | 3/4" x 5" x 10 1/4" | 1 |
| Uprights | quartersawn white oak | 1 1/2" x 1 1/2" x 2 1/4" | 2 |
| Caps | quartersawn white oak | 2" x 2" x 3/8" | 2 |
| Rail | quartersawn white oak | 1/2" x 3/4" x 8" | 1 |
| Candle cups | copper pipe caps | 1"-dia | 2 |
* Length indicates grain direction

Recommendations

canadianhomeworkshop.com is part of the Blue Ant Media
Canada Network
© 2024 Blue Ant Media
More information
Social Media & RSS


Our other sites


No comments
To leave a comment, please log in
Don't have an user account? Register for free