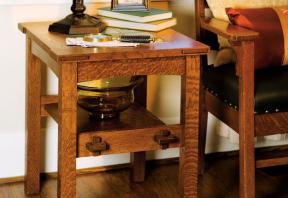
This project is patterned after a table designed by the legendary early 1900s Arts and Crafts designer, Gustav Stickley. I’ve wanted one just like it ever since seeing a black-and-white photograph of an original table, but the price was out of my range. So, I did what woodworkers do when they want something nice: I made one myself.
Striking quartersawn wood grain is a big part of Mission’s appeal. But this isn’t the only traditional Mission material in this project: so are the tiles. Genuine 5/8″-thick, handmade Arts and Crafts tiles would be perfect for tables like mine, but I opted for some similar 4″ x 4″ tiles I found at a local clearance store. The 1/4″-thick, mottled green pattern suited my design. It would be rare to find genuine Arts and Crafts tiles at a local hardware store, but a quick search on the Internet will yield many sources to try. Get your tiles before you build your table. This way you can size the table precisely to fit them. You really don’t want to have to cut 1/8″ off the tiles to fit into the cavity in the tabletop, nor do you want to discover that the tiles stand proud of the surface after you set them.
Time
Multi-Day
Skill
4
Cost
4
The most challenging part of this project is the tabletop and its through-mortise-and-tenon corners. I recommend you use full-scale plans, as I find they help to avoid errors. You can either scale up the included plans or print a downloaded template from this page.
Take a further preparatory step to accommodate your tiles. Lay out the tabletop template on a piece of 1/4" medium-density fibreboard (MDF) to see if your tiles fit within it. Since the top overhangs the base, you have some leeway to make the top larger or smaller to allow the tiles to fit just right.
Begin by cutting and milling all your stock straight and square to the correct widths and thicknesses listed. For now, leave your parts a couple of inches longer than the final lengths specified, just in case you run into cracks or other defects.
I typically use a dado blade on my tablesaw to cut tenons, but for this project I settled on a three-part process that produces cleaner results by allowing me to fine-tune the joint fit by hand. An attractive joint is important since the tenon end remains visible after assembly.
Start with a tablesaw equipped with a dado blade and mitre gauge to cut the tenon shoulders. I screwed a sacrificial fence to the mitre gauge and installed a shop-built zero-clearance insert in the saw's throat. Both of these precautions minimize chipping of the tenon shoulders. Next, use a bandsaw to cut the cheeks of the tenons slightly larger than needed. Finally, use a block plane and shoulder plane to fit the tenon gradually through its corresponding mortise. I used a backer board against the tenon when planing to avoid chipping the edge.
When the tenons fit properly in their mortises, chamfer the ends of each tenon. Use a combination square and a sharp pencil to scribe lines 1/8" in from the ends, then use the square to mark the end-grain at the same 1/8" point. With the pieces clamped in a vise, use a sharp block plane to bevel the edges until you've cut to both lines. Avoid chipping the corners by planing from the corners toward the centre of the board, angling the plane to deliver a shearing cut. Test this chamfering technique on scrap wood if you haven't tried it before.
The tabletop frame is made up of four boards, each one secured with mortise-and-tenon joints at the corners. As you lay out the long and short top boards, note the grain patterns and select the most pleasing effect.
Prepare your joinery starting with the through mortises, which go right through the short top pieces. It's easiest to fit tenons to existing mortises rather than the other way around.
I used a hollow-chisel mortising machine to cut out the 1/2"-wide mortises. This stationary machine combines an auger bit inside a square chisel to bore square holes. Another option is to drill overlapping holes with a Forstner bit in a drillpress, then use a hand chisel to square up the mortises. But even with the luxury of my hollow-chisel mortiser, I always turn to my chisels to complete each mortise. That's because, in this case, the outside of each mortise remains visible where the tenon passes through it. These areas are significant ornamental details, so strive to get those outside edges clean.
When you're satisfied with your mortises, use a fine file to put a very slight chamfer on the mortise edges. This prevents the tenons from splintering the edges as you test-fit.
Even a thin smear of errant glue will show up after you apply stain to the tenons that poke through the mortises in this design. To achieve a clean look, begin by sliding each tenon into its mortise, about 1/2" through, without glue. Next, carefully apply glue to the part of the tenon that is still visible from the back. Use the glue sparingly or it will squeeze out at the tenon shoulder. When all the tenons are ready to go, clamp everything up, then check for square.
In order to prepare your tabletop for the tiles, cut a rabbet around the inside of the tabletop frame to accept the tile substrate from the underside. Adjust the size of this rabbet and the thickness of the substrate to the thickness of the tiles you'll be using. I used a router spinning a bearing-guided rabbeting bit to mill a 3/4"-deep x 1/2"-wide rabbet all around the inside edge of the tabletop's frame. Then I cut a matching piece of 3/4" exterior-grade plywood to serve as a tile substrate. Later, you can install it with pocket screws into the tabletop after you've applied your finish to the rest of the table.
Next, turn your attention to the support structure of the table. In order to position quartersawn figure on the two outside faces of the four legs, cut 1/8"-thick veneer from the leg stock on a bandsaw. Glue it to the flatsawn faces adjacent to the nice quartersawn faces on each leg. I used wood glue and MDF clamping cauls to even out the clamp pressure, ensuring a gap-free fit between the shop-cut veneer and legs. After you mill the legs to their final dimensions and cut them to length, put a slight chamfer on the bottom of each leg with a block plane. This prevents splintering if the completed table is dragged.
The long and short apron pieces and the shelf rails are connected to the legs with simple mortise-and-tenon joinery. These mortises are 1/2" wide, 1” deep and 2 1/2" long. Cut the mortises in the legs first, then cut the corresponding tenons to fit. Do not create the arched cutouts on the aprons just yet.
The wedged tenon joints where the shelf passes through the shelf rails must be cut neatly and accurately. Start by edge-gluing two or three pieces of wood to get the required 13 1/2"-shelf width.
Next, cut four through mortises in the shelf rails. After marking their locations with a pencil, cut from both sides, drilling out the majority of the waste, and clean up with a chisel and file. The mortises must be square and neat on both sides.
While there are measurements on the plans that correspond to my table, there can easily be slight variances when you build. That's why in this case it makes sense to dry-fit pieces together temporarily with clamps, check for square, then take measurements directly from your assembled parts.
Next, measure the actual distance between the two shelf rails. This distance is the between-the-tenons length of the shelf. Remember to add 1 1/2" for the thickness of the shelf rails and 2 3/4" for the length of the tenons themselves to get a final length of the entire shelf piece. Cut your shelf panel to length and mark out the locations of the tenons directly from the rails. Use a bandsaw or jigsaw to cut away the outside corners.
In order to get a straight cut for the cutout between the tenons, use a jigsaw with a cutting guide clamped to the shelf. Or make this cut quickly and accurately with a plunge cut on your tablesaw. Set the fence the required distance away from the blade and raise the blade until it is just higher than the thickness of the wood. Mark the fence at the point at which the blade comes through the saw's tabletop at the front and the back. Then lower the blade and turn on the saw. Hold the shelf against the fence so the mark for the back of the blade aligns with the cutout for the rearmost tenon.
Carefully and slowly raise the blade while it's spinning until the teeth protrude through the top surface. Slowly feed the wood into the blade until the mark for the foremost tenon reaches the mark you made earlier on the fence for the front of the blade. Hold the board securely on the table and against the fence, then shut off the saw. Wait for it to come to a stop before lowering the blade. The saw blade is curved, so the cut will be arc-shaped. You can square it with a jigsaw or handsaw.
Dry-fit the shelf and shelf rails together to ensure that the shelf tenons fit through the mortises perfectly. Again, to prevent chipping during your test-fits, make slight chamfers on the mating pieces.
Next, cut the small mortises that go right through the tenons. These accommodate the wedges that hold the shelf in place. The best way to find their location is to mark the point at which the shelf tenons exit the rail mortises with a pencil line. Since wedges like this work best when they apply real force to the joint by pulling everything snug, you should make your wedge holes 1/16" inside the lines you marked. See the plans for details.
After marking the shape of the wedge holes, drill out the majority of the waste with a 5/8" Forstner bit and clean up the rest with a sharp chisel. To get the angled, outside faces of the mortises just right, cut a block of wood with an edge that's 3º from square that you can clamp to the board to guide your chisel. Also, be sure to clamp a board to the bottom edge of the hole to prevent tearing out the edges when chiselling.
You could make a jig to cut the wedges themselves, but since you only need four, I recommend a simpler method. Cut rectangular pieces of wood 2 1/2" long and draw the taper with a pencil so that one end is 5/8" wide. Use a plane to develop the wedge fit. Test each wedge in a different mortise while the base is dry-fitted together and mark which ones correspond. Use a block plane to adjust the fit.
Next, cut the arcs on the bottom of the apron pieces. Create smooth arcs to trace by bending a thin wooden batten so that at its centre point the rails are 2 1/2" wide, then trace pencil lines on the apron pieces. Make the cuts with a bandsaw or jigsaw, cleaning up the cuts with a compass plane, belt sander or file.
Your last step before assembling the base is to cut chamfers with a block plane on the shelf tenons and sand all the surfaces of the base pieces. Quartersawn white oak can be difficult to finish smoothly, especially if there are small, torn-out chips from the preliminary milling stages. I find a cabinet scraper ideal for cleaning up any problem areas.
Assemble the base with wood glue. Bring the end frames together, then join them with the shelf and the long apron pieces. It's not necessary to glue the shelf's through tenons-all you'll need is a dab of glue to ensure the wedges stay in place. Clamp up everything and be sure to check for square as you go.
I stained and finished my table before tiling so that the wooden edges adjacent to the tiles would be somewhat sealed against the moisture in the tile grout.
With the last coat of finish dry, I attached the top to the base with table irons. While this hardware looks contemporary, it is a historically accurate method for attaching tops to carcasses that allows for seasonal movement.
I recommend you secure the tiles to the table using a ready-mixed acrylic tile adhesive applied with a 1/8" x 1/8" notched trowel.
Next, turn your attention to grouting. Non-sanded wall grout is best for this application. Wait until the finish has cured such that you can put some painter's low-tack masking tape on the wood adjacent to the tiles to protect it while grouting. I used a small grout float to spread the grout. An artist's pallet or putty knife is ideal for working the grout into the edges next to the wood.
Give the grout time to set partially, then carefully sponge off the excess. Wring out the sponge well to keep water off your table. Use a grout-sealing product once the grout has cured to thwart stains.
Building a cherished piece of furniture gives greater satisfaction than shelling out a lot of money for an original. In time, it can also become a family heirloom-something to look upon with pride.
My side table is not an exact copy of the original. However, I did try to follow the design and dimensions from a black-and-white photo of a piece I loved. I was lucky to have some of the important dimensions listed to start, but from there I was in the dark. There are a number of methods for extrapolating dimensions from a photograph or drawing when you want to copy a piece. After buying a digital scanner for my computer, it occurred to me that I might be able to use its capabilities, coupled with the software that came with it, to allow me to copy the table I so dearly wanted.
Put quite simply, I got out my architect's scale and played with the enlargement of the photograph on the scanner, until I came to the point at which the dimensions I knew (overall height, length and width) matched on one of the scales. In this case, when I enlarged the photograph 108 per cent, the dimensions matched the scale. From then on, it was a reasonably easy task to read dimensions directly off the slightly enlarged photograph with my scale.
If you are lucky enough to see a piece you want to reproduce in person, take photos from different angles, but in all shots include something you know the dimensions of (like your shoe or a credit card). When you have the photos in hand, you can scale up the dimensions of the piece using the item you included in the photos.
| Part | Material | Size (T x W x L*) | Qty. |
|---|
| Long top | quartersawn white oak | 1" x 4" x 24 1/2" | 2 |
| Short top | quartersawn white oak | 1" x 4" x 20 1/2" | 2 |
| Legs | quartersawn white oak | 1 5/8" x 1 5/8" x 25" | 4 |
| Long aprons | quartersawn white oak | 3/4" x 3" x 20 1/4" | 2 |
| Short aprons | quartersawn white oak | 3/4" x 3" x 16 3/4" | 2 |
| Shelf | quartersawn white oak | 3/4" x 13 1/2" x 23" | 1 |
| Shelf rails | quartersawn white oak | 3/4" x 3" x 16 3/4" | 2 |
| Wedges | quartersawn white oak | 3/4" x 3/4" x 2 1/2" | 4 |
| Tile substrate | plywood | 3/4" x 13" x 17" | 1 |
| Tiles | Ceramic | 4" x 4" | 12 |
| Table irons | Lee Valley #13K01.50 | 8 | |
* Length indicates grain direction


Recommendations

canadianhomeworkshop.com is part of the Blue Ant Media
Canada Network
© 2025 Blue Ant Media
More information
Social Media & RSS


Our other sites


No comments
To leave a comment, please log in
Don't have an user account? Register for free