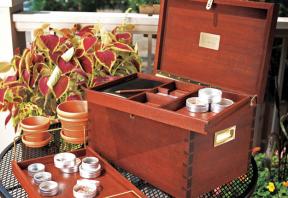
As gardeners, both my wife and I know how much fun it is to collect seeds. We also know how disorganized and dishevelled an old shoebox full of seed packets can get. This seed chest solves the organization problem, but by no means should you copy the plans exactly. Start with the seed storage containers you plan to use (I used watchmaker cases), then adjust the chest’s dimensions around them.
I built my design from meranti, a mahogany-like wood from Southeast Asia. For a project such as this, wood choice is mostly about appearance. Even a pine box made from pallet scraps is an improvement over a shoebox.
I used machine-cut dovetails for the corners. Mitres or box joints require the same length of sides. If you choose to use reinforced butt joints or corner rabbets, you’ll need to shorten the lengths of the sides accordingly. Whatever joinery you choose, never try to cut all the project parts from the materials list at once and then assemble them, even if you’re following my design exactly. Cutting one part at a time to fit the growing assembly ensures a much tighter fit; this method allows for the inevitable differences that appear in each project.
Begin with the trays. Cut the wood for the sides, then prepare corner joinery details and dados for the plywood bottom panels. I milled mine with a 3/16"-wide, bearing-guided slot-cutting bit in a router table. Clamp all the similar tray parts together, then pass their inside surfaces across the spinning bit.
Each of the trays that fit inside my seed chest include a special detail that requires attention. The top tray, for instance, needs dividers. The central compartment of this tray is sized to fit the dehumidifying cartridge I planned to use. The drawings show details that you might want to follow, depending on your design preferences.

The middle tray sits deeper in the box and requires a feature that lets you grab the tray and lift it out. I made simple swivelling handles from 3/16"-diameter solid brass rods. You'll find these at most home centres. The plans show how to bend the brass into a broad U-shape with some nibs on the ends, which act as pivot points. Alternatives include making a wooden handle or using small-gauge chain or decorative cord. Regardless of what method you choose, be sure to drill pilot holes in advance of assembling the tray.
The bottom tray is meant for storing seed packets and requires a few unique details. First, you'll need to cut some finger-access holes so you can lift out the tray. Connect a couple of 1"-diameter holes with two straight cuts on a jigsaw, then clean up the opening with a half-round file. Another detail is the notched rails that hold the dividers while allowing their position to be adjusted from side to side. I located the first notches roughly 31/4" in from either end because the narrowest seed packets I could find were 3" wide. Feel free to adjust the notch spacing as you see fit. To cut the notches most accurately, mill them across a 5"-wide piece of wood, then rip it in half to create opposing sides. Wait until after final assembly to cut the dividers to proper length.
Before assembling any of the trays, smooth them to a finish-ready state by planing, scraping and sanding. For the middle tray, don't slip the handles into the holes until your staining and finishing is complete.
The main box itself is one of the easiest parts of this project. If you can find wide wood, it'll save you the work of edge-gluing boards for the sides, while also looking great. Either way, you'll need material at least 91/2" wide for the main box, with 13/8" wide material for the rim of the lid.
It's traditional boxmaking practice to glue all parts together with the bottom and top panels in place, then separate the lid by sawing it off. But since I really didn't want to find hardened glue drips on the insides of the box after removing the lid, I glued up the bottom of the chest as one assembly, then switched to mitre joints for the lid.
For both the bottom and the top, the plywood panels are double thicknesses, with both good sides facing out. This set-up means that the dados for the panels must be adjusted to fit. If you use a bearing-guided slot-cutting bit to make dados, you'll have to round the corners of your plywood panels to fit the rounded corners of the dado.
Before assembling the box, decide how you want to fasten the lid. I used a 11/2"-wide piano hinge so each leaf could be aligned with the front face of the parts it's attached to. Use a tablesaw to rip a thin strip off the top of the back piece to create a mortise for the hinge. In this case, the box sides stand a little proud of the back and act as the mortise ends. The distance between the box sides then represents the length you must cut the hinge to fit. Use a hacksaw and support the hinge on a piece of wood as you cut it to length, then file off any burrs.
The installation of the other hardware depends entirely on what you choose. I installed inset metal handles on the sides and a simple hasp closure on the front. A keyed lock would have looked great, but I couldn't bear the thought of planting season arriving and the key having gone missing. Since the trays have to lift out of the main box, there are limitations on the kind of lid stays you can use, because you don't want them getting in the way. I installed a mortised Brusso lid stay, and it works well. It came with a good installation diagram and instructions.
I finished the chest with a coat of mahogany red water-based aniline dye, followed by a walnut-pigmented wiping stain. Then, after applying a few coats of semi-gloss polyurethane, I gave the chest several coats of dark brown Briwax to fill in the pores that the wiping stain didn't colour.
Finally, fill up the chest and make plans for your future garden.
Added touch: I installed a dehumidifying cartridge in the seed chest to keep the seeds dry, protecting them from rot. But I do have the following caution: depending on the seasoning and stability of your wood, it's possible for the cartridge to draw moisture out of the wood too quickly, causing it to crack. Keep a fairly close eye on the box initially. If extreme shrinkage becomes evident, remove the cartridge.
| Part | Material | Size (T x W x L*) | Qty. |
|---|
| Box short sides | meranti | 3/4" x 9 1/2" x 12 3/8" | 2 |
| Box long sides | meranti | 3/4" x 9 1/2" x 19 1/4" | 2 |
| Box bottom | mahogany ply | 3/8" x 11 3/8" x 18 1/4" | 2 |
| Lid long sides | meranti | 3/4" x 1 3/8" x 19 1/4" | 2 |
| Lid short sides | meranti | 3/4" x 1 3/8" x 12 3/8" | 2 |
| Lid panel | mahogany ply | 3/8" x 11 3/8" x 18 1/4" | 2 |
| Bottom tray short sides | meranti | 3/8" x 5" x 10 3/4" | 2 |
| Bottom tray long sides | meranti | 3/8" x 5" x 17 5/8" | 2 |
| Bottom tray bottom panel | mahogany ply | 3/16" x 10 1/2" x 17 3/8" | 1 |
| Bottom tray divider rails | meranti | 3/8" x 2 1/2" x 16 7/8" | 2 |
| Bottom tray dividers | meranti | 1/4" x 2 1/2" x 9 1/2"** | 2 |
| Middle tray short sides | meranti | 3/8" x 1 3/8" x 10 3/4" | 2 |
| Middle tray long sides | meranti | 3/8" x 1 3/4" x 17 5/8" | 2 |
| Middle tray bottom panel | mahogany ply | 3/16" x 10 1/2" x 17 3/8" | 1 |
| Top tray short sides | meranti | 3/8" x 1 1/2" x 10 3/4" | 2 |
| Top tray long sides | meranti | 3/8" x 1 1/2" x 17 5/8" | 2 |
| Top tray bottom panel | mahogany ply | 3/16" x 10 1/2" x 17 3/8" | 2 |
| Top tray long dividers | meranti | 3/8" x 1 1/8" x 10 3/8" | 2 |
| Top tray short dividers | meranti | 3/8" x 1 1/8" x 4 1/2" | 2 |
| **cut to fit | |||
* Length indicates grain direction
Recommendations

canadianhomeworkshop.com is part of the Blue Ant Media
Canada Network
© 2024 Blue Ant Media
More information
Social Media & RSS


Our other sites


No comments
To leave a comment, please log in
Don't have an user account? Register for free