Twenty years ago, my wife, Mary, and I cut through a rusty, tumbledown wire fence surrounding an old hayfield and began turning the land into the home of our dreams. Gardens and orchards were part of that vision, but with them have come an unexpected benefit. As perennial flowers, hedges and trees have grown and matured, new birds and animals have moved in, along with plenty of beneficial insects. The bees are my favourite; the more, the better. That’s why I’ve built special accommodations for a little-known pollinating superstar called the mason bee. As populations of other pollinating insects decline across Canada, mason bees hold great promise for maintaining and enhancing the health of gardens and orchards. With just a little help, they thrive.
You’ll need plastic nesting trays to make these bee boxes, and it’s best to get them before you begin work. This way you’ll be able to test the size and shape of your wooden parts as you make them. I used 5/8″-thick eastern white cedar for my boxes, roughly the standard thickness of fence boards. If your material is a little thicker or thinner, no matter. The design works the same without need for modification.
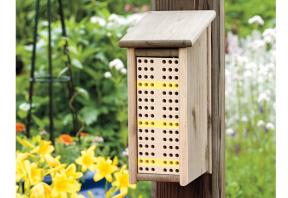
Mason bees get their name from a mortar-like mud compound they use to seal tube-shaped holes where females lay eggs. Lack of suitable nesting holes can be a limiting factor in mason bee populations, and that's where a good bee box comes in. Although mason bees happily lay eggs in 5/16"-diameter holes drilled into wood, this arrangement isn't ideal. The problem is pollen-feeding mites. They build up after several years use, eating the pollen meant for growing larvae. To solve this problem, Dr. Margriet Dogterom, a professor at Simon Fraser University, has developed plastic mason-bee brood trays that can be taken apart for annual cleaning.
My bee box design, which fits these trays, includes a few key details. The nesting trays slide in and out easily for annual cleaning, while also being protected from the weather. The sloped roof is removable and includes a compartment underneath to put mason bee cocoons for supplemental springtime hatching.
Start by cutting the sides, back and bottom slightly larger than finished size. You could trim these parts now and put them together with square edges, but I opted to rout a little-used rounded profile that creates an effect I find quite attractive. Instead of using a regular roundover bit, I milled all exposed edges with a 1"-diameter bullnose bit in a table-mounted router.
This technique puts a part-circle profile on the wood that's classier than more conventional full-round shapes. This works out most efficiently if you rout all the edges you can, trim parts to final size (except the sides and back; leave them long for now), then rout any remaining edges. As you work, test-fit box parts around your nesting trays. Make sure there's enough clearance around the trays so you can pull them out freely. And don't forget, your wood will swell when it gets wet outdoors, so build in a little extra room.
Use weatherproof glue (I went with polyurethane) and stainless-steel nails to join one side piece to the back. Next, add the bottom and inner top, followed by the second side. At this stage, you should have completed the main body of the bee box. The top, however, ramains too long and does not yet have its proper slope.
I angled the top of my bee box to shed water by sawing the sides and back of the assembly 15º from square on my sliding compound mitre saw as an assembled unit. The 12"-diameter blade almost cut through the entire assembly, but not quite; I sawed the last remaining bit of wood by hand. If you have a smaller mitre saw (or none at all), angle the top ends of the sides and back before assembly.
Regardless of how you do the work, be sure that the front edges of the sides rise 1/4" higher than the top surface of the inner top. This extension creates a gap under the front of the roof that allows mason bees to emerge after hatching from the top chamber, if you decide to use it.
Cut the bee box top to length and width, glue 1/4" dowels into holes on its bottom surface, then create matching, unglued holes in the top edges of the sides. These protruding dowels hold the lid in place, yet allow the top to come off easily when you need to get into the brood chamber.
Leave the wood bare or finish it with a non-toxic outdoor finish, then mount the bee box to a post or tree using a couple of deck screws driven through the back. An east-facing location warms the bees quickest in the morning, encouraging them to get an early start pollinating your fruits and vegetables while filling your garden with a pleasant humming sound.
You plan carefully where each seed and plant will go. Then you water, weed and prune to make sure your garden thrives. But have you ever thought of attracting insects for the betterment of your flowers?
Bees are one of the most efficient pollinating insects around. Attracting them to your garden can help your flowers flourish and your plants prosper. Having a place for them to breed, such as this bee-box project, is a great start. Another good idea is to use plants that will attract and promote pollination. Some plants that bees love are:
- dogwood
- black-eyed Susan
- sunflower
- hyssop
- wild geranium
Once you have a place for bees to breed and flowers they are attracted to, be sure to avoid presticides to keep your garden's ecosystem healthy. -–Jodi Avery Maclean
| Part | Material | Size (T x W x L*) | Qty. |
|---|
| Sides | white cedar | 5/8" x 6 3/8" x 12 3/4" | 2 |
| Back | white cedar | 5/8" x 5 3/8" x 13" | 1 |
| Bottom/inner top | white cedar | 5/8" x 3 9/16" x 6 1/8" | 2 |
| Top | white cedar | 5/8" x 6" x 7 7/8" | 1 |
* Length indicates grain direction
Recommendations

canadianhomeworkshop.com is part of the Blue Ant Media
Canada Network
© 2025 Blue Ant Media
More information
Social Media & RSS


Our other sites


No comments
To leave a comment, please log in
Don't have an user account? Register for free