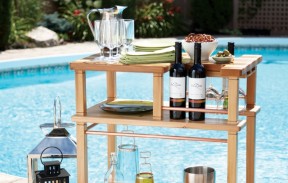
This fun-to-build project doesn’t require a huge investment in materials. In fact, the entire thing is made up of standard cedar deck lumber, 1/2″-diameter copper water pipe and a single ceramic tile—all standard stuff from any home-improvement store. Designed to be used both indoors and out, this rolling bar uses material and a finish that allows it to live happily outside during the summer, then roll inside when the cooler weather approaches.
Start by preparing the wood for the top, and the middle and bottom shelves. The top is made with 2x6 cedar planed down to 1 1/4" thick, then laminated. Make the blank slightly longer than needed at 30 1/2" to allow for trimming later. For visual interest, I alternated strips of red cedar with some white cedar I had on hand. Use waterproof wood glue such as Titebond III on panel pieces, then clamp them together and set aside to cure.
The middle shelf starts with four pieces of 5/4" x 6" decking, planed to 7/8" thick, ripped to width, then laminated together to form a U shape. The two outside pieces are 30" long, while the two inside pieces measure 17 3/4". The open end created by these shorter pieces is necessary to provide clearance for wine glasses that hang down in the completed project. Plane more 5/4 decking for the bottom shelf, then laminate pieces to get a blank large enough to yield the 18" x 30" panel you’ll need.
While the laminations are drying, make the legs and supports. I used a piece of cedar 4x4, jointed on two faces, then ripped in half to end up with two pieces measuring approximately 1 3/4" x 3 1/2" each. I then ripped these two pieces in half again, and planed the four pieces down to a final dimension of 1 1/2" x 1 1/2". With stock now milled to size, it’s time to cut pieces to length. For this cart, you will need four parts cut to 19" long for the legs, and six more at 8" long for the upper supports.
For an added detail on these parts, I cut a decorative 1/8"-wide x 1/8"-deep dado 1/2" in from each end of all the 1 1/2" x 1 1/2" stock. To add these dados, start by clamping a small stop block to the leading end of the tablesaw fence, well ahead of the blade, then position the fence so the edge of the stop block is 1/2" to the right of the blade. Position the blade so that it extends 1/8" above the tablesaw surface. With one leg supported on a mitre gauge, slide the leg over until it hits the stop block, then push the mitre gauge and leg forward into the blade to create the decorative cut. If you’re doing things right, there should be a space between the fence and leg when the blade comes in contact with the wood. Rotate the wood and repeat the process on all four sides of the ends of all the legs and upper supports. (The plans show what these decorative details should look like.)
Now, you’ll need to bore holes to accept the 1/2"-diameter copper pipes that make up the support rails. Mark the locations of the hole centres, keeping them centred on the faces of the 1 1/2" x 1 1/2" cedar, and 2" from each end of each leg. Also, mark pipe holes on the appropriate upper supports, 2" up from the bottom ends (as shown in the plans). After double-checking to make sure you’ve marked the correct faces, drill 5/8"-diameter x 3/8"-deep holes for the pipes.
Next, draw an X on both ends of each leg and upper, marking their centres. Drill 3/8"-diameter x 3/4"-deep holes at these marks to accept the 3⁄8"-diameter dowels that join the legs and supports to the laminated panels.
Now, remove all three panels from the clamps, and trim them to length and width. Mark the location of the 4 3/4" x 9 1/4" rectangular cutouts on the top (as shown in the plans). I used a jigsaw to create them. With these cutouts completed, sand all three panels until they’re flat and smooth. Finish up by using a 1/4"-radius roundover bit on all edges of the three panels.

The top face of the bottom shelf, both faces of the middle shelf and the underside of the top shelf need to be marked for dowel and screw holes that connect to the legs and upper supports. The hole centres for the legs need to be 1 1/2" in from both outside edges, while the holes for the centre two upper supports are 1 1/2" in from the edge, and 14 1/4" from the end with the U-shaped opening. While making 3⁄8"-diameter dowel holes in the underside of the top, don’t drill all the way through; these holes must be only 3/4" deep.
With all hole centres marked, use a 3/8"-diameter countersink bit to make holes 1/2" deep in the underside of the middle shelf. You’ll use these countersunk holes later to accept 3/8"-diameter fluted dowels after anchor screws are driven in, so the size of the countersink is important. If you don’t have a 3/8"-diameter countersink bit, drill the holes in two stages. Start by making a 1/8"-diameter hole through the wood, then follow up with a 3/8"-diameter x 1/2"-deep hole for the dowel.
Now, it’s time to cut the copper pipe and assemble the frame. You will need four pieces of pipe cut to a length of 26 1/4" and three at 14 1/4" for the lower section, plus two more 12"-long pieces for the upper section, which hold bottles in place.
You can cut the copper pipe with a traditional pipe cutter, but there’s a much faster method: a mitre saw spinning a fine-cut carbide blade. Copper, like aluminum, is a non-ferrous metal and is readily cut with carbide-tipped woodworking tools. However, unlike wood, sawing metal throws sharp chunks instead of sawdust. Proper eye protection isn’t just a prudent precaution; it’s a must to protect your eyes. Your copper pipe is probably tarnished and marked up, so give each piece a good cleaning with #0000 steel wool. Coat the shiny copper with spray lacquer to delay future tarnishing.
Start by inserting the pieces of copper pipe for the lower section into the holes in the legs, arranging the entire leg/pipe assembly upside down on the floor. Next, sit the bottom shelf in place and attach it to the legs with #8 x 2 1/4"-long deck screws driven into the predrilled holes and into the legs. It’s essential that each screw enters its leg at the centre of the Xs you drew earlier.

Repeat this process with the middle shelf and the upper supports. Glue a 3/8"-diameter x 1 1/4"-long fluted dowel into each of the four countersunk holes in the underside of the middle shelf. There should be 3/4" of dowel left protruding, ready to be inserted into the holes you drilled earlier into the tops of the legs. Next, it’s time to add a skirt to the bottom of the cart. This skirt is a rectangular frame made up of two pieces of 3/4" x 2 1/2" x 29" and two more at 3/4" x 2 1/2" x 15 1/2", connected with simple butt joints and secured with #8 x 1 1/2"-long deck screws set into counterbored and plugged holes. Assemble the skirt frame and secure it to the bottom of the lower shelf with a series of pocket-hole screws on the inside face, ensuring the frame is centred on the panel.
Before you glue the top panel to the upper supports, dry-fit these parts with 3/8"-diameter x 1 1/2"-long fluted dowels. If the parts don’t come together during the dry-fit, either drill the holes in the supports a little deeper or cut the dowels a little shorter. When you are satisfied with the fit, apply glue into the 12 dowel holes (six in the top ends of the upper supports, and six into the underside of the top). Clamp the parts together, then check to make sure the top is sitting tightly against the upper supports before allowing the glue to dry.
What would a portable wine cart be without a place to store stemware? The hanger on this cart is simple to make using a tablesaw with a dado blade. A router with a straight bit works too. The two outside pieces are made from one board that receives a dado cut before being sawn in half. To make these pieces, rip a 1"-thick x 12 3/4"-long piece of cedar to 4" wide. With a dado blade or router bit raised to 5/8", cut out the middle of the board, leaving 3/4" of material on each side. Once this groove is cut, just flip the stock over so that the groove is facing up and rip the board exactly in half—you will have the two matching outside pieces.
The middle piece of the stemware hanger is a little trickier to make. You’ll need to start with a board measuring 1" x 4 x 12 3/4", then cut two grooves out of it starting 7/16" in from each side, cutting to a depth of 5/8". The result looks like a horizontal E with the centre bar measuring 3/4" wide. Turn over the stock on the tablesaw so the dado side is up, then rip off the 7/16" tabs from the outside edges to make the T-shaped piece.
The glass hanger is formed when its parts are screwed into position to the underside of the top. The middle section of the stemware hanger is centred on the underside of the top; the outer pieces of the hanger are positioned flush with the edges of the notched cutouts. Fasten these pieces with #8 x 13/4"-long screws driven through predrilled and countersunk holes.
If you’d like to add a tile to your top, now’s the time to rout a recess to accept it. For this step, you could build a jig, but since there was just one recess involved, I decided to cut it freehand.
Position the tile on the top shelf where you want it, then trace its perimeter with a sharp pencil. Next, chuck a straight bit into a small router and set the depth to slightly less than the thickness of the tile. Rout out the waste, stopping just inside the lines. Clean up the recess with a sharp chisel, testing the fit of the tile as you go. There should be enough clearance so the tile drops in and comes out easily.
Now, it’s time to choose your finish. I sprayed water-based polyurethane, but just about any finish will work. If your wine cart will live outdoors most of the time, spar varnish is an option. Exterior-grade oil also works well and is easily renewed. When your finish is dry, insert the tile into its recess, and add casters. Now, all that’s left to do is to slide glasses into the hanger, put a couple of bottles on the shelves and relax…maybe even with a glass of wine.

| Part | Material | Size (T x W x L*) | Qty. |
|---|
| Top | 1 1/4" x 18" x 30" | 1 | |
| Middle shelf and bottom | 7/8" x 18" x 30" | 2 | |
| Legs | 1 1/2" x 1 1/2" x 19" | 4 | |
| Upper supports | 1 1/2" x 1 1/2" x 8" | 6 | |
| Skirt ends | 3/4" x 2 1/2" x 29" | 2 | |
| Skirt sides | 3/4" x 2 1/2" x 15 1/2" | 2 | |
| Stemware hangers | 1" x 4" x 12 3/2"** | 2 | |
| Upper copper rails | 1/2"-dia. x 12" | 2 | |
| Long copper rails | 1/2"-dia. x 26 1/4 | 4 | |
| Short copper rails | 1/2"-dia. x 14 1/4 | 3 | |
| Tile (optional) | 12" x 12" | 1 | |
| Casters | Lee Valley #00k25.01 | 4 | |
* Length indicates grain direction
Recommendations

canadianhomeworkshop.com is part of the Blue Ant Media
Canada Network
© 2026 Blue Ant Media
More information
Social Media & RSS


Our other sites


No comments
To leave a comment, please log in
Don't have an user account? Register for free