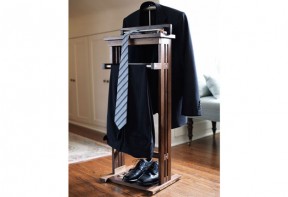
As I was designing this suit valet, I struggled with the balance between form and function. I wanted to take the classic furniture concept of a valet and give it a modern twist, while also retaining all the functionality of the original. In the end, my solution was simple: I combined traditional black walnut with the modern look of aluminum. The metal is fantastic to work into your designs. Carbide woodworking tools will machine and cut it very much like wood.
Start by jointing and planing lumber down to a final thickness of 7/8". As you rough cut the parts, arrange the grain orientation to make the most of your wood’s natural beauty.
Cut the side uprights, then install a 3/4"-wide dado blade in your tablesaw.
I used half-lap joints throughout this project. To prepare them, raise the blade to half the thickness of the wood and complete a test cut on scrap. Using your mitre gauge with an extension, cross cut the dados in the uprights and the crossers, starting with the 3/4"-wide cuts. Finish by making the 1 1/2"-wide cuts in two passes. Test-fit and fine-tune your cuts as you go. The pieces should be loose enough to fit with gentle pressure, but tight enough to stay assembled without glue.
Once all of the side pieces are cut and tested, drill a 5/8"-diameter hole in one end of each of the long crossers to accept the aluminum pants bar. Assemble the sides with a little glue in each joint, but be careful as you work. The two sides must be mirror images of each other. Eventually the sides will be joined by stretchers. For now, cut the stretchers but don’t assemble them yet.
For maximum stability, I made the valet with a flat base, with aluminum rods to serve as a shoe rack. Cut the four base pieces, then use a dado blade to cut the half-lap joints that connect everything. Take a look at the plans for details.
Mark locations for the 3/8"-diameter aluminum rods, and drill through the base runners with a drillpress, using a backer board to prevent tearout. Cut three pieces of rod 17 1/8" long (that’s 1/8" longer than required), then scuff up 1 1/2" at each end with 100-grit sandpaper so the glue can grab. Assemble the base using wood glue in the joints and a little epoxy in the holes for the rod. Each rod should extend 1/16" proud from each side. Once the epoxy has set and the glue is dry, sand the rod flush to the base using a random orbit sander spinning 150-grit paper or a belt sander.

Precision is key when cutting visible half-lap joints. Test fit and fine-tune each joint with care for a striking finish.
The main part of the top is a 17 1/2" x 7" plank with a 1/2"-deep x 3 3/4"-wide cove cut into the top for holding change and keys. To cut the cove, I put a 7 1/4"- diameter dado blade in my tablesaw, and set up a temporary fence at 90º to the blade. (It’s important to note that you need to set up the temporary fence on the infeed side of your blade to push the stock against the fence as it is cut.) You can mill an ideal wide cove after feeding the stock sideways over incremental raises of the blade.
Start with the dado blade set just 1/16" above the table, then make an initial pass. Raise the blade 1/16" at a time until you’ve reached the final depth of 1/2". Complete on the final pass without raising the blade, to smooth the surface. Remove the remaining marks in the cove with either a curved scraper or sandpaper.
Next, cut the three back parts, as well as the piece of aluminum rod. Drill centred 3/8"-diameter holes in the ends of the blocks. Put a little epoxy into these holes and slide the rod in, then attach the blocks to the back panel. Put the back panel on the top piece with a thin layer of glue. You will further reinforce these joints later.
Cut the hanger support and arm pieces now. Drill 3/8"-diameter holes, 3/4" deep and spaced 2 1/2" apart, in the top of the support to accept the rod that will hold the hanger. Fasten the hanger support and arm together with glue, then reinforce the joint by driving a couple of #8 x 13/4" screws into countersunk holes up from the bottom for added strength.
Once assembled, glue the entire hanger support assembly to the back of the back panel, keeping it flush at the bottom.
In keeping with the modern look, I used aluminum rod for dowels to reinforce the joints for the top bar blocks and the attachment of the hanger support. Simply drill through the material with a 3/8"-diameter brad-point drill bit, 1 1/2" deep. Apply epoxy in the holes, and insert 1 9/16"- long pieces of 3/8" aluminum rod then sand flush. To dull the aluminum, scuff it with 100-grit paper. For the non-visible reinforcement of the back panel to the cove-cut top, use three #8 x 1 1/2"-long wood screws in counterbored holes driven up through the bottom.
The curved hanger consists of six strips of walnut and a strip of aluminum flat-bar, all laminated around a form.
Saw seven strips of walnut to 21" long x 1 1/4" wide and just a shade over 1/8" thick. (The extra piece is to prevent clamp marks on the other pieces.) Plane each to a final thickness of 1/8".
To begin laminating, layer the strips on the form, applying glue to the mating surfaces of the wood. Treat the aluminum centre strip the same way, except scuff it well with 100-grit sandpaper first and use slow-cure epoxy in place of wood glue for that lamination. Once all the strips are glued, place the protective strip over the stack with no glue.
Starting from the middle, bend the strips around the form with clamps, checking to make sure the edges stay flush. Give the clamps an extra crank and set the assembly aside until the epoxy has fully cured.
Once the hanger is solid, you need to drill six holes—four for the reinforcing aluminum dowels, and two for hanger support rods. Drill the outside four holes on the drillpress at 90º to the hanger, using a 3/8"-diameter bit. Drilling from the bottom, drive the bit completely through. Take your time. If you drill too quickly, the aluminum plate will heat up and the epoxy will let go.
The two centre holes need to be drilled differently than the others. They must be drilled 2 1/2" apart to match the hanger uprights. Drill the holes straight down through the top so the parallel rods go in properly. Drill these holes in two stages, with two different drill bits to make mounting the hanger possible. First, drill 1/8" holes completely through the hanger. The easiest way to do this is to centre the hanger back on the form and drill straight down into the form. Follow these holes with a 3/8" drill bit, stopping when you hit the aluminum.
Epoxy 1"-long pieces of rod into the outside four holes. When the glue has dried, trim off the ends of the hanger so they’re flush. Finish-sand the whole thing with 180-grit paper, making sure to knock off any sharp edges.
To mount the hanger on the stand, put some epoxy in the holes in the bottom of the hanger and in the top of the hanger arm. Insert 7 1/2"-long pieces of 3/8" rod to attach the hanger to the stand. Put more epoxy into the holes at the top of the hanger and insert 1"-long pieces of rod to complete the hanger mounting.

Working with the aluminum rods and flat bar for the hanger is similar to working with wood; you just need stronger tools to shape and cut the material.
Now for the fun part—bringing the parts together! Start by cutting 16 3/4" lengths of the 5/8" pants bar, then four pieces of the 3/8" rod to 1 3/4" long. Bring the two side assemblies together with stretchers and the pants bar. Begin by gluing the pants bar into place with epoxy, then insert the stretchers with glue applied to the ends. Get everything in place, and hold it together with clamps while the glue dries. Once the glue and epoxy have set, but before removing the clamps, reinforce the joints by drilling a 3/8"-wide x 1 3/4"-deep hole through the centre of the crossers on the sides, and into the ends of the stretchers. Put epoxy into the holes, and tap in 1 3/4" pieces of aluminum rod to act as dowels. Sand these dowels and the ends of the pants bar flush with the surface of the wood.
The body of the stand is held to the base with glue and four wood screws. Turn the assembly upside down and centre the base. Prepare four countersunk holes through the base and into the side uprights of the stand. Apply a thin layer of glue on the bottoms of the uprights, then centre on the base and secure with four #8 x 1 3/4" screws.
Attach the top to the side uprights with two fluted dowels and a bead of glue. Drill 3/8"-diameter x 3/4"-deep holes into the topmost crossers, centring them on the rear of the crosser between the dados.
Place 3/8" dowel centres in these holes, then centre the top section on the base, leaving the front overhanging by 1 1/2". Press down to mark the location for the matching holes required in the top. Drill these holes (also 3/4" deep) into the bottom of the top piece, then glue the joint with dowels.
Cut the tray to size, then mill the centre section out with a router. I chose to do a stepped recess to act as a small drawer, but you can configure this tray to hold whatever you’d like simply by switching router profiles.
Once you have the tray portion to the shape you’d like, glue it to a drawer front measuring 1 1/2" high x 15 3/4" long, keeping the tops flush. Then clamp and let dry.
I used 3/8" rod for the drawer runners. The rod slides through holes in 1 1/4" x 1 1/2" guide blocks that can be screwed to the inside of the main body. See the plans for details.
To drill the locations for the runners, clamp the drawer assembly in place, and slide a 3/8" brad-point drill bit through the guide holes (by hand) from the back and press it into the back end of the drawer front. This process will mark exactly where on the drawer front you need to drill to accept the guide rods. On the drillpress, drill 3/8" holes 3/4" deep at these spots, and glue the two 6" lengths of aluminum rod in place. While the epoxy is curing, make the tray stop. After the assembly is finished, slide this stop over the end of the rod and secure it in place with a little more epoxy.

I used one of my favourite finishes for walnut: Minwax tung oil finish. Sand the entire project to 180-grit, and continue sanding any exposed end-grain to 220-grit. Apply a heavy coat of oil to the entire piece, wait 10 minutes, then wipe off any excess (and any that has found it’s way onto the aluminum). Wait overnight, then repeat the process, rubbing the piece down with #0000 steel wool between coats. After five coats, rub down the surface one more time, then apply a coat of dark paste wax and buff. Move the project into a place of honour in your bedroom. You now have no excuse for leaving your clothes heaped on the floor.
| Part | Material | Size (T x W x L*) | Qty. |
|---|
| Stretchers | black walnut | 7/8" x 1 1/2" x 14" | 2 |
| Wide side uprights | black walnut | 7/8" x 1 1/2" x 36" | 4 |
| Narrow side uprights | black walnut | 7/8" x 3/4" x 36" | 2 |
| Short crossers | black walnut | 7/8" x 1 1/2" x 4 3/4" | 6 |
| Long crossers | black walnut | 7/8" x 1 1/2" x 7 3/4" | 2 |
| Pants bar | aluminum rod | 5/8"-dia. x 16 3/4"-long | 1 |
| Base runners | black walnut | 7/8" x 2" x 14" | 2 |
| Base crossers | black walnut | 7/8" x 2" x 17" | 2 |
| Shoe bars | aluminum rod | 3/8"-dia. x 17"-long | 2 |
| Top | black walnut | 7/8" x 7" x 17 1/2" | 1 |
| Top bar | aluminum rod | 3/8"-dia. x 13 1/4"-long | 1 |
| Back | black walnut | 7/8" x 2 3/4" x 15 1/2" | 1 |
| Hanger arm | black walnut | 7/8" x 5" x 4 1/2" | 1 |
| Hanger support | black walnut | 7/8" x 1 3/4" x 5" | 1 |
| Hanger strips/flat bar | black walnut/aluminum | 1/8" x 1 1/4" 21" | 7 |
| Hanger uprights | aluminum rod | 3/4"-dia. x 7 1/2"-long | 2 |
| Tray | black walnut | 7/8" x 2 1/2" 12 3/8" | 1 |
| Tray front | black walnut | 7/8" x 1 1/2" x 15 3/4" | 1 |
| Tray runners | aluminum rod | 3/8"-dia. x 5 1/2"-long | 2 |
| Tray stop | black walnut | 7/8" x 1" x 14" | 2 |
| Guide blocks | black walnut | 7/8" 1 1/4" x 1 1/2" | 2 |
* Length indicates grain direction
Recommendations

canadianhomeworkshop.com is part of the Blue Ant Media
Canada Network
© 2025 Blue Ant Media
More information
Social Media & RSS


Our other sites


No comments
To leave a comment, please log in
Don't have an user account? Register for free