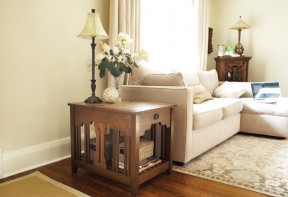
While legendary Arts and Crafts furnituremakers would see their works reflected in this end table, it does have a few features that would leave them scratching their heads. The mortise-and-tenon joinery connecting beautiful quartersawn white oak speaks to the design elements used by craftsmen such as Gustav Stickley, Charles Limbert and the Greene brothers. These furnituremakers also would have appreciated the project’s fumed finish. But, they might be a little perplexed by the hinged lid at the front, covering a hidden compartment. This nook is vented so that a laptop can keep cool, and has holes through the back for power cords and cables. Although Stickley, Limbert and the Greenes never saw a microchip, I’m certain that the pioneers of the Mission furniture style would have approved of these practical innovations.
Skill
5
Begin by digging through your lumber supplier’s woodpile to find some thick stock for the legs. Cut four leg blanks to size and then taper the ends as shown in the plans on page 39. You can do this at your tablesaw using a tapering jig or make the cuts freehand with a bandsaw. Follow up with a hand plane and a sanding block to remove any saw marks left behind by the blade.
Next, grab a square and a straightedge to lay out the mortises that connect the legs to tenons on the ends of the upper and lower rails. All the mortises are 1/2" wide x 1/2" deep (although the length will vary according to the width of the connecting members). In the plans on page 37, you will see that the upper rail at the front is set back farther in than the others to make room for a false drawer front, which means the corresponding mortises on the front legs are recessed farther back. After completing the layout, prepare the mortises. I used a dedicated mortising machine to remove the waste material from my slots. A 1/2"-diameter brad point bit and a sharp chisel will also get the job done.
Your next task is to cut out blanks for the upper and lower rails. Also, prepare an additional blank for the false drawer front. There is a decorative, stepped pattern applied to the bottom edge of the upper rails, but hold off on completing this detail until after the tenons are done, so you’ll have flat edges on the blanks while you cut the tenons. I created my tenons at the tablesaw by making shoulder cuts around all four sides of each end with a stacked dado blade. A stop block clamped to the mitre gauge’s fence ensures uniformity. I like to make my tenons a little on the tight side to start, which allows me to fine-tune the fit with a shoulder plane or sanding block later.
After preparing the tenons, there’s nothing holding you back from shaping the curved bottom edges of the upper rails and false drawer front. The process begins by making templates from 1/4"-thick medium-density fibreboard (MDF) or plywood. You will need one long template for the two side rails and a shorter version for the workpieces at the front and back.
After cutting out the templates, sand the edges until they are smooth. Use these templates to trace the patterns onto the blanks and then cut out the profiles at the bandsaw while remaining approximately 1/16" on the waste side of the layout lines. Next, secure the templates to the workpieces with a few strips of double-sided tape and head over to the router table to clean up the rough edges using a bearing-guided, flush-trim bit.

The traditional looking table has some contemporary elements. An access hole at the back of the inner compartment allows you to charge your computer while keeping it out of the way

A vent keeps your laptop from overheating in the compartment
An arrangement of vertical slats adorns the space between the upper and lower side rails. The slats link to the rails with mortise-and-tenon joints. The first step is to prepare the mortises on the enclosing edges of the rails. Measure carefully when you complete the layout because any slots that are misaligned will stick out like sore thumbs once the slats are installed.

The slat with the keyhole slat is actually two slats, which makes this feature easier to build
After preparing the mortises, get to work on the slats. Begin by cutting all the narrow slat blanks to size. Also, make a few spares of each length (long and short) in case you run into problems tailoring them to fit the frame openings. Next, mill a tenon on one end of each blank. Cut these tenons to fit the mortise openings in the bottom rails but don’t install them in the slots. When you’re done, attach the legs to the side rails temporarily using a couple of bar clamps (but no glue) to secure the joints. One by one, rest the shoulder of each tenon on the lip of the lower rail and scribe a line on the side of each slat at the top, where it meets the upper rail. This line marks the exact location of the shoulders for the upper tenon. Use a square to continue the line around all four sides and then complete the tenon on the top end. Be sure to mark the slats so they can be returned to the same location during final assembly.
The wide slat situated in the centre of each side assembly has a design that mirrors the appearance of the upper rails with a keyhole-slot design cut out of the middle. Although these details make the construction process a tad more challenging, I have a couple of tricks up my sleeve that will help you achieve success. For instance, each single wide slat is made from two pieces. I designed the slats this way to make it easier to prepare the slot in the centre. Begin by cutting out a pair of blanks for each slat. To achieve a matching grain pattern, cut both parts in sequence from the same board or slice thick material through its width to create an interesting bookmatched pattern.
Now, you need to find some more 1/4"-thick plywood or MDF to make a pair of router templates. One of the templates will be used to apply the stepped profile to the outside edges of the workpieces and the other will form the slot design on the edges that meet in the middle. As before, trace the patterns onto the blanks, cut out the profiles at the bandsaw, then use a bearing-guided, flush-trim router bit to clean up the rough edges. Depending on the diameter of your pattern bit, you may have a problem getting into the narrow channels located on the ends of the slot. Check this out first; if there’s a problem, use a 1/2"-diameter drill bit to round the ends of the passages and then cut along the sides with the bandsaw. After completing the pattern routing, glue the segments together; a spring clamp gripping the joints on each end will help keep the surfaces aligned as clamping pressure is applied to the sides. When the glue is dry, follow the same process as before to prepare the tenons on the ends. If you’re using your tablesaw to create the tenons and you find your mitre gauge’s fence is too short to span the flat sections on the ends of the slats, fasten a long board to the fence to extend its reach.
Before moving on to the next step, add the completed slats to the side assemblies and link the side frames together with the rails at the front and back. At this stage you’re only going to dry-fit the parts, so leave the glue bottle on the shelf.
As you can see from the plans, a board runs between the midpoints of the side rails at the top. This part serves as the back of the laptop storage compartment. While the table base is assembled temporarily, measure the distance between the side rails accurately. This process lets you cut the compartment back to fit the opening. Using a 1 3/8"-diameter spade bit, drill a hole 2" from each end of the compartment back for power cords and cable access. Biscuits provide a fast and easy way to attach this workpiece to the side rails. Cut slots for #20 biscuits, then dry-fit the piece to the upper side rails.
There also are two wide gussets that stretch between the upper rails in the area behind the storage compartment. These parts fasten the back section of the tabletop to the base. When you cut out the gusset that runs along the back rail, you will need to notch the corners to fit around the legs. During final assembly, simply glue these parts to the interior walls of the opening—no tenons or mechanical fasteners are required.
Guess what? The time has finally arrived to assemble the base with glue and clamps. Get ready by dismantling the base and giving all the parts a final once-over with 220-grit sandpaper. Whenever I have a lot of parts that need to come together at the same time, I like to work out the sequence by completing a dry run. For this project, the best strategy was to construct the side assemblies first and then bring the sides together with the compartment back and the rails at the front and rear. After squaring the opening at the top by equalizing the diagonal measurements, I installed the tabletop gussets with glue and clamps. Wipe any squeeze-out with a damp rag before leaving the base to dry overnight.

The bottom of the laptop storage compartment consists of a flat panel that rests on narrow cleats. Glue up boards to prepare the panel blank for the bottom, then trim the edges to size after the adhesive has cured. The panel should fit tightly between the rails at the sides, but leave about 1/8" of wiggle room at the front and rear to allow for seasonal movement across the grain. Don’t worry about the resulting gaps at the edges because they will be covered with trim strips after the bottom is installed. Now, mill 1/2"-wide x 1/2"-deep rabbets on all four edges of the bottom panel to fit over the support cleats.
You also need to cut out an opening in the centre to receive a plastic vent grill that allows cool air to circulate throughout the enclosed compartment. Use the vent grill as a pattern to lay out the opening. Drill a starter hole and then cut out the opening with a jigsaw. Test-fit the vent in the opening, but hold off from gluing it in until after the finish is applied to the project.
Next, cut out and install the cleats that will support the compartment bottom panel. They’re fastened to the walls of the storage compartment with glue and clamps. Start by mounting the cleats at the front and rear, then use these as guides to align the strips for the sides. After the glue dries, slip the compartment bottom into place and prepare the trim strips that will conceal any gaps around the edges and hold the panel in place. When you install the trim, apply glue only to the sides of the trim parts, not to the bottoms, so the panel can float freely in the opening.
The magazine rack at the bottom of the table is the easiest part of this project to build. All we have here is a series of chamfered slats resting on a couple of recessed support cleats. Cut the cleats to size and glue them to the inside faces of the lower rails with the bottom edges flush. This arrangement should leave you with a 3/4" recess at the top that hides the ends of the slats. Cut out slats to fit snugly between the front and rear rails and chamfer the top edges with the tablesaw blade tilted 45°.
Prepare for installation by finish-sanding the parts and cutting out a bunch of 3/4"-wide spacers from scrap that will be used to set the gaps between the slats. Lay the slats by starting on the outside and working your way toward the centre. Apply a dab of glue to the bottom ends of each slat and clamp them to the cleats.
The top of this project is made from two slatted panels capped on the ends with a traditional tongue-and-groove breadboard edge. As I mentioned before, the front section of the tabletop is hinged to serve as a lid for the laptop storage compartment, leaving only the back panel attached to the base permanently.
Begin by cutting enough 2"-wide blanks to complete both panels. Make the workpieces a little longer than specified in the materials list to provide room to trim the ends once the panels are assembled.
After cutting out the blanks, chamfer the top edges at the tablesaw. These bevels form V-grooves between the rows when the slats are joined. To maintain square edges around the perimeter of the tabletop, don’t bevel the outside edges of the slats that will be located at the ends of the panels.
When all this work is done, gather some clamps and spread glue on the joints to assemble the slats. Have a damp rag at the ready to wipe up any glue that seeps into the V-grooves on top and check to make sure the panels are flat before leaving them to dry overnight. The next day, scrape off any glue residue from the bottom of the panels before trimming the edges to the finished dimensions.
Now that you have straight edges on the sides, you can prepare the long tenons that will connect with the breadboard ends. These tongues are created by milling a matching pair of 1/2"-wide x 1/4"-deep rabbets along the top and bottom edges. (See plans on page 37.)
The breadboard ends hide the end-grain of the slats and help keep the panels flat. I cut the breadboard ends for the front and rear panels from the same board, creating a continuous grain pattern along the entire length of the sides. (It’s attention to small details such as these that will take your craftsmanship to the next level.)
After cutting out the workpieces, prepare 1/2"-deep x 1/4"-wide grooves along the edges to engage with the panel tenons. I completed this work at the tablesaw using a two-step process that results in perfectly centred slots every time. (See “Groovin’ on the Tablesaw" on page 36 for more on this technique.) Once the grooves are complete, chamfer the top inside edges of the panels and the breadboard ends so that the parts form V-grooves when they are connected. When you cut the bevels on the panel edges, set the saw blade low enough so it doesn’t cut into the tenons that extend over the blade.
You may be tempted to glue the end caps to the edge of the panels, but this move would be a big mistake. The glue joint would restrict the natural movement of the panels across the grain and could cause the top to buckle or crack over time. A better solution is to pin the breadboard ends tightly to the panel edges using expansion slots in the tenons that allow the top to swell and shrink as humidity levels change. This procedure may sound complicated, but it’s actually not a difficult joint to construct if you follow each step carefully.
To begin, lay the panels face-down on the bench with the breadboard ends clamped securely to the edges. Your objective is to make three holes in each breadboard joint exactly 5/8"-deep so they penetrate all the way through the bottom of the breadboard ends and tenons, but only partially through the lip of the groove at the top. Mark one hole in the centre of each joint and the others about 1" from the ends. Use a 1/8"-diameter brad-point bit to drill the holes. A piece of tape wrapped around the bit is a good way to indicate when you’ve reached the proper depth. These holes will receive narrow dowels that will serve as anchor pins. Now, remove the breadboard ends and elongate the holes located near the ends of the tenons to create expansion slots. With a drill bit in the proper hole, rock the bit from side to side, parallel to the edge of the panel. Don’t expand the hole in the centre of the joint because you need to maintain a tight fit there.
After cutting out a bunch of 3/4"-long pins from 1/8"-diameter dowel, you’re ready to assemble the parts. First, apply some glue to a 2" section in the centre of each joint, then slide a breadboard end onto each tenon. Next, spread some glue on the shaft of each pin destined for a centre hole and gently tap the pins into place as far as they will go. Don’t be concerned that the tips are protruding because you will saw and sand them flush later. Take the pins for the ends—without any glue on their shafts—and start them in the holes. Stop tapping when the pins are about two-thirds of the way into the holes, apply a dab of glue to the ends and then drive them the rest of the way home. Once the glue is dry, sand the ends of the pins flush with the underside of the panels.
Mount the rear panel to the base from beneath with four screws installed through predrilled holes in the gussets. Secure the lid to the fixed tabletop panel with a pair of full-wrap inset hinges.
You may be surprised to learn that the finish on this project didn’t come from a bottle or a can; it was achieved using a technique called “fuming.” Fuming is the traditional finishing method used by the early craftsmen who originated the Mission furniture style. If you would like to give this age-old technique a try, see “Finishing with Fumes” below.
After applying the finish of your choice, glue the vent grill in place with epoxy, install the hardware on the false drawer front, then secure the drawer face to the front rail with a couple of screws driven into place from inside the compartment. Once you have reattached the rear section of the tabletop and the hinged lid, install a section of plated chain to support the lid. One end of the chain is screwed to the inside of the compartment wall and the other is attached to the underside of the lid panel. Now, you’re all set to move the end table into your home and hook up the laptop to search online for your next project.
As the story goes, the principles of fuming were discovered by accident when early farmers noticed a change in the colour of oak barn beams after being exposed to the pungent vapours from livestock urine for long periods of time. But rest assured, you won’t need a hundred head of cattle if you want to give this technique a try. The key ingredient in the fuming process is ammonia, whose vapours react chemically with tannic acid found naturally in the fibres of some woods. This reaction turns the surface of the wood a darker colour. Before applying a fumed finish to your project, you should be aware that not all species of wood have the required levels of tannic acid to trigger the oxidation process. White oak is the traditional choice for Mission-style furniture, but the technique will also work well on walnut and cherry. Regardless of the species you’re working with, very little tannic acid is found in the sapwood of the tree, so avoid these parts of the boards when you’re building your project.

Safety First
Also note that working around ammonia can be dangerous if you don’t follow proper safety precautions. First of all, never open a container of ammonia unless you’re wearing a gas-compliant respirator, rubber gloves and goggles to protect your eyes. Cartridge-style respirators are not very expensive and are available to buy or rent at most home-improvement stores. Next, it’s important that you work outside in a well-ventilated area that is not accessible by curious young children or pets. Finally, it’s a good idea to have a fresh bucket of water around in case you need to rinse off quickly after a spill.
The most challenging part of fuming may be locating the 26 per cent ammonia solution required to complete the process (also referred to as aqueous ammonia, or ammonia hydrate). Highly concentrated ammonia solutions are becoming more difficult to find in small quantities, but you may have some luck purchasing a couple of litres from farm suppliers, janitorial services, blueprinting companies or refrigeration-repair services. If you can’t locate 26 per cent ammonia solution, I’ve been told that the 5 to 8 per cent concentration found in common household cleaning ammonia will also get the job done, but the process takes much longer.
After finding a supply of ammonia, your next task is to prepare the chamber that will house the project and contain the caustic fumes. For smaller projects, you can use a plastic storage container with a snap-on lid, but larger pieces will require the construction of a simple wood frame covered on all sides with 6-mil polyethylene plastic. Don’t use metal containers because the ammonia will corrode the surfaces rapidly.
Ready, Set, Wait
After gearing up, place the project in your containment chamber, along with an open tray of ammonia solution. One or two cups of the liquid in a wide-mouthed Mason jar or glass pie plate should do the trick. Make sure there is air space between the project components so the ammonia vapours can reach all the surfaces requiring exposure. Now, seal up the seams of the containment tent with tape and let the project sit for a period of time.
In a short while, the buildup of fumes will engulf the project and begin turning the wood a darker shade. Remember to put on safety gear before opening the chamber to check the progress. If the volume of space in the containment unit is relatively small, the finish may reach the desired shade after only a couple of hours of exposure. Larger projects may need to sit for a day or more because of the lower concentration of fumes. I fumed the Mission table for a total of 16 hours and I replaced the ammonia supply with a fresh batch about halfway through the process.
When the wood has reached the desired shade, place the project in a well-ventilated area for a couple of days to release the remaining ammonia gasses trapped in the pores. Store the used ammonia solution and get rid of it at a hazardous waste disposal site.
After completing the fuming process, you can topcoat the surfaces with the finish of your choice. For the Mission-style end table, I applied three coats of polymerized tung oil to further enhance the grain and protect the wood surfaces.
| Part | Material | Size (T x W x L*) | Qty. |
|---|
| Legs | white oak | 1 3/4" x 1 3/4" x 23" | 4 |
| Upper side rails | white oak | 3/4" x 6 1/2" x 24 1/2" | 2 |
| Upper rear rail | white oak | 3/4" x 6 1/2" x 18 1/4" | 1 |
| Upper front rail | white oak | 3/4" x 4" x 18 1/4" | 1 |
| False drawer front | white oak | 3/4" x 6 1/2" x 17 1/8" | 1 |
| Lower side rails | white oak | 3/4" x 2 1/2" x 24 1/2" | 2 |
| Lower front/rear rails | white oak | 3/4" x 2 1/2" x 18 1/4" | 2 |
| Short narrow slats | white oak | 1/2" x 3/4" x 12 1/2" | 8 |
| Long narrow slats | white oak | 1/2" x 3/4" x 13 3/4" | 8 |
| Wide slats | white oak | 1/2" x 2 3/4" x 15" | 4 |
| Compartment back | white oak | 3/4" x 4" x 18 3/4" | 1 |
| Tabletop gussets | white oak | 3/4" x 2" x 18 3/4" | 2 |
| Front/rear compartment cleats | white oak | 3/4" x 1/2" x 18 3/4" | 2 |
| Side compartment cleats | white oak | 3/4" x 1/2" x 13 3/4" | 2 |
| Compartment bottom | white oak | 3/4" x 14 3/4" x 18 3/4" | 1 |
| Front/rear compartment trim | white oak | 1/2" x 1/2" x 17 3/4" | 2 |
| Side compartment trim | white oak | 1/2" x 1/2" x 14 3/4" | 2 |
| Magazine rack support cleats | white oak | 3/4" x 1 3/4" x 17 1/4" | 2 |
| Magazine rack slats | white oak | 3/4" x 1 1/2" x 25" | 8 |
| Tabletop slats | white oak | 3/4" x 2" x 18 1/2" | 14 |
| Rear breadboard ends | white oak | 3/4" x 2 1/4" x 12" | 2 |
| Front breadboard ends | white oak | 3/4" x 2 1/4" x 16" | 2 |
| Vent grill (Lee Valley #00U0881 ) |
1 | ||
| Mission drawer pull (Lee Valley #01G6270) |
1 | ||
| Full-wrap hinges (Lee Valley #01H3050 ) |
2 | ||
| Plated restraint chain | 24"-length | 1 | |
* Length indicates grain direction
jointer
planer
tablesaw
router table
biscuit joiner
jigsaw
drill
mortiser
hand plane
spring clamps
Recommendations

canadianhomeworkshop.com is part of the Blue Ant Media
Canada Network
© 2025 Blue Ant Media
More information
Social Media & RSS


Our other sites


No comments
To leave a comment, please log in
Don't have an user account? Register for free