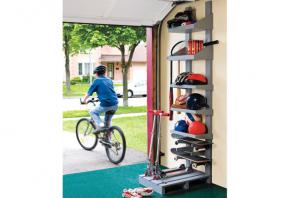
The garage seemed big enough when you moved in. Of course, that was a few years ago and now you’re trying to park a minivan where the sedan used to sit. The kids are also getting bigger, which means bigger bikes leaning against the walls. And the skateboards, scooters, rollerblades and soccer balls seem to be multiplying and taking over what little space remains!
This sports organizer is designed to be a simple garage accessory to help you pack a lot of stuff into a small and narrow space. It is a lot easier to keep the garage clean if you have a proper place to store things. I designed this organizer as a series of modules. Depending on your needs, you can make more or less of each kind of module, as well as mix and match to suit your situation.
You don’t need fancy material to build this project. A few 2x4s, some 1x2s, 1x3s and leftover pieces of plywood will do very well.
Start by cutting two 2x4s to 89" tall and screwing them to the wall 121/2" apart. This height was chosen to just fit under the tracks of our garage door. Make use of the full amount of available vertical space by adjusting the length of your 2x4s to suit the height you have. The boards are fastened with their wider face against the wall. With the 121/2" space between them, you should be able to screw both boards directly into wall studs, which are typically set on standard 16" centres. (See "Weigh Anchor" on page 66 for tips.) Be sure to pick the straightest 2x4s you can find for this application. Use a 4' level to ensure that they are perfectly vertical as well as parallel to each other. The spacing between these boards affects the dimensions of all the modules, so if you change this figure, you will need to adjust the other measurements to fit.
The scooter storage module is inspired by bike storage racks where the wheels are trapped in the gap between sets of two boards. There are also right-angle notches for the front wheels, which let you store scooters with their handlebars turned in. This set-up allows you to fit scooters very close together, yet still have them easily accessible.
Before constructing this module, check the dimensions against your own fleet of scooters to see if any adjustments are necessary. Scooters vary in length, wheel size and in how flat the underside of the deck is. This last feature affects how steady the scooters will stand in the module. Cut six 3/4"-thick deck boards to 3" x 29" and three pieces of 2x4 to 21". Measure 3" back from the front of each board and cut a 11/2" x 13/16" notch. This notch is for the front wheel to turn sideways for tight storage. The boards are positioned in pairs, 1" apart, with the notches facing in to receive scooter wheels. (The notches need to be wider than 1", as the front wheels tilt back at a slight angle.)
Screw or nail the deck boards down onto the three 2x4 support boards. The front and back 2x4s provide enough strength to support the scooters. The third 2x4 section is positioned 12" back from the front. This support acts as insurance against the efforts of rambunctious kids who invariably step and jump on everything in sight.
One option to consider is cutting a pair of 3/4"-deep rabbets in the rear 2x4 support board to fit around the two vertical 2x4s of the organizer. These notches help lock things together tightly and pull the scooter module just a bit tighter against the wall. If your garage is like mine, even an extra 3/4" of space is welcome. If you choose to do this step, you will want to cut the rabbets before you assemble this module, then cut the deck boards to match.
Supporting a skateboard is quite simple. They tuck nicely into the low space behind the scooters, requiring only a horizontal support arm at each end. For each skateboard, cut two arms 10" long by 3" wide. Use a jigsaw or bandsaw to taper the arms so they narrow to 11/2" tall at the front, then fasten them to the inside edges of the vertical 2x4s. The tapering ensures that the arms fit between the wheels on the skateboards. There are variations among skateboards, so measure yours to check these dimensions. The first set of support arms is positioned 5" above the scooter module. Each additional pair of support arms is positioned 1" above the previous pair.
Basketballs and soccer balls roll off of conventional shelves like water off a duck. But a simple pair of support arms, along with front and back crosspieces, let balls rest securely.
For each module, cut two crosspieces 191/2" long, and two support arms 11" x 3". As with the skateboard arms, use a jigsaw or bandsaw to taper the parts so they narrow to 11/2" tall at the front. Fasten one crosspiece in between the front of each arm, leave a 7" gap, then fasten the rear crosspiece. This arrangement should create a gap wide enough for balls to sit in securely, without falling through. I fastened the whole module to the outside of the vertical 2x4 supports, leaving a vertical gap of 9" between each ball-storage assembly.
A basic shelf is also a useful addition to hold soccer shoes, bike helmets and so on. This shelf is designed with a lip on the front, as well as on the sides, to help prevent things from rolling off.
Cut two sides 8" tall x 12" long, then trim them so they narrow to 2" tall at the front. The bottom is 12" x 191/2". Cut out a 31/2" x 11/2" notch at each back corner, such that the bottom wraps around the vertical 2x4 supports. Fasten the bottom between the two sides and then attach a 11/2"-tall board along the front to provide a front lip for the shelf. As with the ball-storage module, the sides are fastened to the outside of the vertical 2x4 supports.
The bat storage module is the simplest of the set. Cut a 12" length of 2x4 and rip it to 3" wide. Measure 11/4" in from the front edge of the board and 31/2" in from each end, then drill two 15/8"-diameter holes. Each hole is wide enough to hold the handle of a bat without it being so wide that the bat would drop through it. This arrangement gives room to store two baseball bats. With a bit of adjustment in hole placement, a third bat-hanging hole can be added.
Cut a 11/8"-wide notch between the front edge of the board and the hole. The notch needs to be just a hair wider than the narrowest part of the bat to allow it to slip in and out of the hanging hole. Round over the outside front corner for safety, as illustrated in the plans. The exact dimensions of this curve are not crucial.
Fasten this module to the outside of one of the shelves, with two screws driven from the inside of the shelf side to secure the bat storage. Leave the shelf screws accessible as you install the bat module. If not, you'll have to remove the entire module assembly if you ever want to reposition the shelf.
| Part | Material | Size (T x W x L*) | Qty. |
|---|
| Vertical supports | spruce | 1 1/2" x 3 1/2" x 89" | 2 |
| Deck boards | pine | 3/4" x 3" x 29" | 6 |
| Support boards | pine | 1 1/2" x 3 1/2" x 21" | 3 |
| Skateboard side arms | plywood | 3/4" x 3" x 10" | 2 |
| Ball side arms | plywood | 3/4" x 3" x 11" | 2** |
| Crosspiece | pine | 3/4" x 1 1/2" x 19 1/2" | 2** |
| Side arms | plywood | 3/4" x 8" x 12" | 2** |
| Shelf bottom | plywood | 1/2" x 12" x 19 1/2" | 1** |
| Shelf front | pine | 1 1/2" x 2" x 19 1/2" | 1** |
| Baseball bat hanger | spruce | 11/2" x 3" x 12" | 1 |
| **Per module | |||
* Length indicates grain direction
Recommendations

canadianhomeworkshop.com is part of the Blue Ant Media
Canada Network
© 2026 Blue Ant Media
More information
Social Media & RSS


Our other sites


No comments
To leave a comment, please log in
Don't have an user account? Register for free