Make your own picture albums
Transform workshop scraps into treasured keepsakes
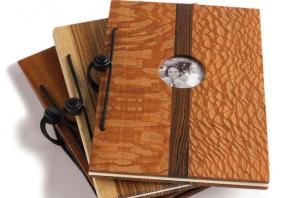


The design for these picture albums started out as an easy gift project. They’re simple enough to make, and using some unusual wood (such as zebra, koa, lacewood or bocote) makes it unlike anything you can buy. You’ll need a bandsaw and thickness planer to mill the thin stock required for the covers, or you can buy it off-the-shelf from wood suppliers who sell parts and materials for instrument makers. This approach is slightly more expensive, but the quantities of wood required are small enough that the added expense doesn’t add up to much. Whatever approach you take, choose woods with interesting figure and colour. This project is a good chance to work with some expensive exotics without breaking the bank. You should also pay extra attention to grain patterns and orientation as you cut and arrange parts. Look at wood patterns closely and position them in a balanced way, aligned with the sides and centre of the cover outline. You should also be aware of growth ring orientation in the wood you use. The more perpendicular the growth rings are to the face of each piece of wood, the more reliably your album covers will resist warping with seasonal changes in humidity.
The skinny on thin wood
Start the project by resawing rough stock to 3/8″ thick. This involves slicing wood vertically on edge, and a bandsaw is the ideal tool for the operation. If your bandsaw can’t handle the full dimensions of the album covers, resaw smaller pieces and laminate them together to get the wider dimension you need. You can also rough-saw narrower pieces of wood in a similar way on the tablesaw. Take a rip cut on one edge, then flip the wood over and cut again from the other edge, raising the blade incrementally with each pass. With your wood roughcut, start trial-fitting the pieces together, looking for best appearance. I often sandwich a darker strip of wood between the laminated pieces for contrast. Wood with an angled grain pattern is best arranged in a book-matched pattern, with the joint line exactly in the middle of the front cover. Complete the milling procedure by planing the stock down to its final 1/4″ thickness using a surface planer after glue-up. Next, rip the front and back covers to width and crosscut to final length.
One of the best features of these albums is the hole in the front cover. It allows the photo on the first page to show through, inviting you to look further, and it turns the album into a picture frame when displayed on a small easel. Measure and mark the location of the hole, then use a circle cutter mounted in the drillpress to cut it. You could use other kinds of bits, but this one does the best job. Perform some test cuts in the wood you’re using before attempting the hole in your cover. You need to be sure that your circle cutter is sharp enough to cut cleanly so that it doesn’t burn the wood. Next, clamp the front and back covers together and drill the 3/16″-dia. holes for the binding cord that holds the covers and pages together. Clean holes are key here, so be sure to use a backer board underneath your covers to eliminate tearout around the hole. A brad-point bit produces the cleanest entry of any wood bit, and it’s definitely worth using in this case. Sand the covers up to 220-grit and apply four coats of polymerized tung oil. After a week or two of curing time, follow up with a couple of coats of paste wax. A fine 3M rubbing pad under a random- orbit sander does a terrific job of power-buffing the cover surface.
Jump to a section
- Page 1 : Easy gift project from exotic wood
- Page 2 : Assembly; marks of distinction
To leave a comment, please log in


No comments