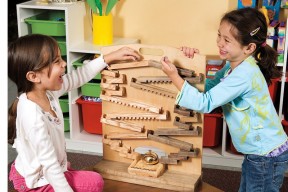
Marble racing toys have been around for ages, and with good reason. Kids love the speed, competition and noise; and if all those marbles don’t make enough racket, the bell at the finish line will. My design is simple enough that kids can join you in the shop for part of the building process and, with your supervision, lend a hand. The more comfortable you make your kids in the shop, the easier skills will come to them if they decide to have their own shops as adults.
Time
1 Hour
Skill
1
Cost
1
Throughout this project, I recommend sanding all parts up to 150-grit before assembly. The small nooks and crannies can be tough to sand once assembled.
To start, cut the base to size. You may need to laminate thinner stock to get the required 1 5/8" thickness. For the bell block, start with 5" x 5" stock that's at least 1" thick. Use a bandsaw to cut a taper, making it 1" thick at the back and 1Ú4" thick at the front. Cut the three wall strips, then mitre the ends so they fit together at the front corners. Fasten the bell on the block, centred from left to right and 13Ú8" from the thin edge.
Next, cut out a 17" x 21" piece of 1/2"-thick Baltic birch plywood for the back. At the top, cut a 1" x 4" oval hand hole, centred 1Ú2" down from the top edge. A Forstner bit does a great job on the hand-hole ends; connect the holes with a couple of jigsaw cuts. While you're at it, angle off the top two corners of the back too.
Finally, cut out a hole in the middle of the bottom of the back, to accommodate the bell block. It should be 6" wide x 3 1/2" tall at the sides, arching up to 4 1/2" tall in the middle. Complete the back by rounding over all edges. Prepare the base now, including a 1/2"-wide x 1"-deep dado groove to hold the back. Locate the groove 3/4" from the rear edge, then glue the back panel into place. Fill the open gap underneath the bell block hole with a strip of scrap wood, then glue on the bell block. Use the angled scrap left over after tapering the block to help while clamping.

You'll need about 5' to 6' of each kind of trough assembly (both light and dark colours), which can then be sawn to length as needed. It's much easier to just glue-up a few long pieces like this, as opposed to 24 small ones.
All trough parts measure 1/4"-thick x 3/4"-wide. They vary only in the length. If you have thin stock available, plane it down to 1/4" thick, then cut 3/4"-wide strips. If you're working with 3/4"-thick material, simply saw off 1/4" slices. Either way, glue these strips into three-sided troughs, as shown in the plans. A few scraps of 3/4"-thick plywood make great spacers to keep the sides parallel.
Despite your best efforts, the bottom of each trough may slide around during glue-up. To fix this, set your jointer to make a very fine cut, then run the dried trough blanks over it. This step creates a perfectly flush and smooth bottom.
The trough ends are 1"-long pieces of wood, slightly rounded on top with a sander, then glued into one end of most sections. They stop the marbles from rolling in the wrong direction. Cut your troughs to length, and begin assembly from the bottom up. Use glue with small screws or nails to hold each trough piece in place. Follow the pattern in the plans, or come up with your own. The only real concern is to make sure that no two troughs are placed so close together that the marbles get stuck. For the two topmost pieces of trough, you can cut a 10¼ angle on the ends, so they can be positioned together for a nice, clean appearance.
One assembly method that works well is to use spring clamps to position the first few troughs. Try running a marble through to make sure the placement works. If it does, mark the location with a pencil, remove the trough then glue it. Repeat the process until you're at the top. See "Trough Set-Up," above, for some fun options.

Apply two coats of Circa 1850 Tung 'n' Teak oil to bring out the grain. The hardest thing about finishing this fun project is keeping the children away from it long enough to let the oil dry!
| Part | Material | Size (T x W x L*) | Qty. |
|---|
Base |
|||
|---|---|---|---|
| Base | Walnut | 1 5/8" x 5" x 17" | 1 |
| Back | Baltic birch plywood | 1/2" x 17" x 21" | 1 |
| Bell block | Spalted maple | 1" x 5" x 5" | 1 |
| Bell block walls | Spalted maple | 3/8" x 1/2" x 5" | 3 |
Troughs |
|||
|---|---|---|---|
| Extra short | Walnut and Ash | 2 1/2" x 2 1/2" x 2 1/2 | 4 of each species |
| Short | Walnut and Ash | 3" x 3" x 3" | 3 of each species |
| Medium | Walnut and Ash | 7" x 7" x 7" | 3 of each species |
| Long | Walnut and Ash | 10" x 10" x 10" | 2 of each species |
| End stops | Walnut and Ash | 1/4" x 3/4" x 1" | 18 |
* Length indicates grain direction
Recommendations

canadianhomeworkshop.com is part of the Blue Ant Media
Canada Network
© 2026 Blue Ant Media
More information
Social Media & RSS


Our other sites


No comments
To leave a comment, please log in
Don't have an user account? Register for free