When I built my new shop, I knew right from the start that I would be hanging a lot of tools and supplies on the walls. I also knew from my previous shops that locations and requirements would change as new tools were added. Rather than punching more holes in the walls every time I needed to hang or move something, I opted instead to mount two rows of cleats around the entire shop.
The cleats have a 45º bevel on their top edges, which allows the matching parts on the storage accessories to lock into place. Made entirely of 3/4″-thick MDF, this mounting system is inexpensive and easy to install.
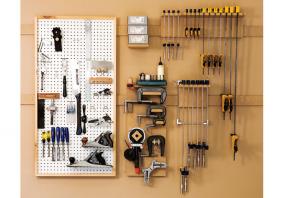
Getting items off the ground and my workbenches is easier (and neater-looking) than ever. I mount as much as I can on the wall cleats–everything from clamp organizers to the pencil sharpener.
Accessorize your workshop’s wall cleat system:
Build a pencil station
Build a paper towel holder
Build clamp racks
Build a pegboard
Get started with the heart of the system: the cleats. From a standard sheet of 3/4"-thick MDF, rip 16 strips 2 7/8" wide x 8' long. Once the strips are cut, angle the blade on the tablesaw to 45º and cut the bevel along one edge, leaving a 1/8" flat spot at the point. The blunt edge strengthens the tip so it doesn’t get chipped during use. See the wall cleat plans for details.
With all your cleats sawn, mount them on walls where you need storage. For maximum flexibility, I used two sets of rails positioned 61" and 82" from the floor, anchored with #10 x 2 1/2" countersunk screws driven into the studs every 16". Drive a screw through one end, sit a level on top of the cleat, then move the opposite end into position before locking it there with a second screw. Finish up by driving screws into each stud in between. Just remember to mount each wall cleat with the bevel facing upward and toward the wall.

Once you build your cleats, you can create whatever storage solutions you need to suit your workshop.
Tool Rest: Using a large piece of MDF as a backer, create a resting place for various tools. Measure anything you’d like to store out of a toolbox and cut rests and notches for them. A few screws and you’re suddenly very organized!
Simple Shelf: A simple scrap of MDF on a cleat can hold the cartons of screws and plugs you use most often.
Basic Box: Build a box out of MDF, screw it to a cleat and drop in any odds and ends you have lying around on your workbench.
| Part | Material | Size (T x W x L*) | Qty. |
|---|
For one cleat |
|||
|---|---|---|---|
| Cleat | MDF | 3/4" x 2 7/8" x 24"** | 1 |
| **Make cleat as long as needed for the area and accessories to be hung up | |||
* Length indicates grain direction
Recommendations

canadianhomeworkshop.com is part of the Blue Ant Media
Canada Network
© 2025 Blue Ant Media
More information
Social Media & RSS


Our other sites


No comments
To leave a comment, please log in
Don't have an user account? Register for free