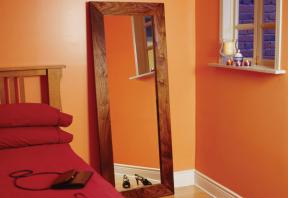
This mirror is proof that beauty and simplicity really can come together in the same project. And in this case it’s wood and careful workmanship that make for success. The wood I bought came ready-planed to 1 1/2″-thick, and that’s an ideal size for a mirror this large. You could go down as thin as one inch for a floor mirror half this size, but that’s about it. Any thinner and you’ll have trouble creating a suitable rabbet in the back for the mirror surface.
Cut each mirror side member to 4 1/2" wide on a tablesaw, then joint the sawn edges to make them smooth and true. Although you could prepare the mitered ends on each side member now, it makes more sense to create the 1/2"-wide x 3/4"-deep rabbet grooves first. A tablesaw with a dado blade is an ideal tool for this work because the mirror parts are so large. Second-best is a table-mounted router spinning a large rabbeting bit.
Crisp, gap-free miters are essential for a mirror frame you can be proud of, and a good miter saw makes this work easy. But for consistently accurate cuts, it's essential that the saw is set up to cut exactly 45°. That's why you may need to fine-tune miter settings by using a drafting triangle. Place the triangle against the saw's fence, and then bring the blade down along the triangle's longest side to show if any adjustments are needed. This step gets you in the 45° ballpark, but you can do more. Complete several cuts on wide pieces of wood, then check them with your triangle. The wider your test boards, the more magnified and easy to see the errors.
While you're at it, check the bevel angle of the saw too. Your machine must cut absolutely straight up and down for good miters in stock this thick, and the best way to check this is also by measuring a few test-cuts. The thicker the wood, the more easily you'll see problems, so test-cut a 4 x 4 or something like it. A metal machinist's square is an ideal tool for checking results.
Aside from accurate cuts, tight miters depend on opposite sides of the mirror being exactly the same length. Mark and cut your miters now, then dry-fit the parts on a large, flat surface. As you'll see, the need for minor adjustments is almost guaranteed when mitering with stock this thick. Remember, the exact dimensions of your mirror aren't important, so adjust as needed. No one will know if things get smaller than specs. All that matters is tight joints.
Use a biscuit joiner to sink two #20 biscuits into each joint, dry-fit the frame again, then bring everything together under clamping pressure but without glue. A strap clamp is the tool of choice. The strap applies even pressure all around the frame at once. Without this advantage, you'll need to wrestle with four bar clamps two across each end of the frame. A C-clamp across the top of each joint maintains vertical alignment while you work.
When everything looks tight, tear it all down and reassemble with glue. Once the frame is dry, use a random- orbit sander to smooth the joints and surrounding wood, first with a 150-grit disk, then with 180-grit, then 220-grit.
I used tung oil because it's easy to apply and looks terrific on dark woods such as walnut. Wipe a coat on, let it sit for a few minutes, then wipe off the excess and let dry for 24 hours. Repeat the process four times, using #0000 steel wool between coats to create a smooth surface. For extra lustre, coat with paste wax after the oil has dried for several weeks.
Measure the size of mirror you need, then order a piece that's 1/8" to 3/16" shorter and narrower. Protect it under a piece of cardboard or thin plywood fit into the rabbets. Tap in some glazier's points, along with a bead of silicone caulking to prevent rattling. Now stand back and admire.
| Part | Material | Size (T x W x L*) | Qty. |
|---|
| Sides | walnut | 1 1/2" x 4 1/2" x 60" | 2 |
| Top and bottom | walnut | 1 1/2" x 4 1/2" x 60" | 2 |
| Mirror | glass | 20" x 52" * | 1 |
| * Approx. size. Measure your completed frame | |||
* Length indicates grain direction


Recommendations

canadianhomeworkshop.com is part of the Blue Ant Media
Canada Network
© 2025 Blue Ant Media
More information
Social Media & RSS


Our other sites


No comments
To leave a comment, please log in
Don't have an user account? Register for free