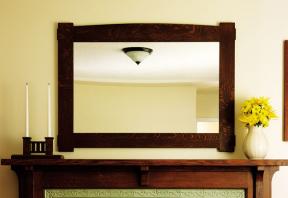
This mirror is a classic variation on the Mission design theme that elevates simple rails and stiles while also showing off your joinery skills. I added a slight convex arc on the top rail, but you don’t have to stop there. A concave arc on the mirror’s bottom rail is also an option. The flat frame surfaces are ideal for inlay or incised carvings. Simple corbelled candle sconces could also be mounted to the stiles.
The exposed corner tenons are key to the design. Mission principles allow structural details to serve as decoration.
Time
Multi-Day
Skill
4
Cost
4
Ideally, the size of every mirror frame should be tailored to fit the place where it's going to hang. Find a home for your mirror before you start work, then adjust length and width dimensions to suit the space. Begin by choosing and milling your wood. I used quartersawn white oak-the classic species for Mission designs-although other hardwoods work fine too. The rails and stiles are all 3/4" thick. Notice that the top rail is an inch wider than the bottom rail, to accommodate the arc. Once you have milled your stock, lay out, cut and test assemble all mortises and tenons without glue.
You have a couple of options for preparing the arc on the top rail. You could make a router template to match the curve, then rough-cut it with a jigsaw before using a bearing-guided flush-trimming router bit to transfer the final shape to your wood. You could also trace the arc directly onto the wood, rough-cut it with a saw, then refine the shape with a block plane or belt sander. Either way, draw the arc by tracing a bent piece of thin wood, or set up a very large compass with a long piece of rigid scrap pivoting on a finishing nail.
After the curve is cut, join the frame parts permanently with glue. Just be careful. You have to keep glue off the ends of the tenons. They'll be peeking out the other sides of the mortises after assembly, and glue would mar the effect. You can stay tidy by finishing the parts before assembly, or finishing the tenon ends only. This way any extra glue wipes off easily. Here's another option: insert the tenons partway into their mortises, then apply glue to the tenon sides. Keep the glue back far enough from the shoulders to prevent squeeze-out. Brush on a coat of glue, followed a moment later by another, thinner coat. This two-stage approach helps spread the glue evenly, while also ensuring that the joint isn't starved of adhesive. Proper glue application is one of those things that gets better with practice, so be patient with yourself if things don't go perfectly.
Clamp the frame together, checking that it's square and flat. When the glue has set, plane, scrape or sand any misalignment. Next, cut a rabbet all around the inside back of the frame to accommodate the mirror. A bearing-guided rabbeting bit in a table-mounted router works best. Take shallow passes, no more than 1/8" deep at a time. If chipping is a problem, carefully rout with the bit's direction of travel rather than against it. This is called climb cutting and it produces very fine cuts, although you need to be careful.
 Since you're pushing wood in the same direction as the router bit spins, be careful that the wood isn't pulled out of your hand. As you work, aim to rabbet deep enough so there's room for both the mirror and a protective back panel of 1/8"-thick hardboard. Square up the corners with a chisel.
After completing your favourite Mission finish, order some mirror with an adhesive safety backing applied. It'll help hold the glass together if the mirror ever breaks. Install the mirror in the frame and cover the back with a protective piece of hardboard. Insert brads or glazing points into the frame.
Hanging a large mirror like this can be a bit of a challenge, especially if you are using picture wire. A French cleat is a better way. Simply cut a piece of 1/2" x 2" stock a little shorter than the mirror width, then rip the stock down the middle at a 45º angle. Using a level, fasten one half on the wall so that the bevel faces the wall pointing up, and fasten the other piece to the top of the back of the mirror so the bevel faces down. Place the mirror against the wall so the two pieces of wood interlock.
All that's left now is to stand back and admire the view.
Since you're pushing wood in the same direction as the router bit spins, be careful that the wood isn't pulled out of your hand. As you work, aim to rabbet deep enough so there's room for both the mirror and a protective back panel of 1/8"-thick hardboard. Square up the corners with a chisel.
After completing your favourite Mission finish, order some mirror with an adhesive safety backing applied. It'll help hold the glass together if the mirror ever breaks. Install the mirror in the frame and cover the back with a protective piece of hardboard. Insert brads or glazing points into the frame.
Hanging a large mirror like this can be a bit of a challenge, especially if you are using picture wire. A French cleat is a better way. Simply cut a piece of 1/2" x 2" stock a little shorter than the mirror width, then rip the stock down the middle at a 45º angle. Using a level, fasten one half on the wall so that the bevel faces the wall pointing up, and fasten the other piece to the top of the back of the mirror so the bevel faces down. Place the mirror against the wall so the two pieces of wood interlock.
All that's left now is to stand back and admire the view.
If you have a small project (or a project with small parts, such as this mirror), try the most traditional Mission finish: ammonia fuming. This process darkens white oak through a chemical reaction with the tannin in the wood. It adds a rich tone you can't get from regular stain. It also creates a consistent colour that even the best finishers can have trouble achieving with stain. Household ammonia will work, especially if the project is small and you have a fuming chamber that is an appropriate size. However, with this weaker version of the chemical, it will take a longer amount of fuming time to create the look you want. To speed things up, you can buy industrial-strength ammonia (known as 26 per cent) from chemical suppliers and possibly even blueprinting suppliers. You should be very careful when working with ammonia-work outdoors, and always wear a respirator, gloves and goggles. You must take even greater care if you use industrial ammonia. To complete the fuming, you need an airtight container. You can build your own box from wood and seal all the joints but one opening side with clear silicone. Seal the final joints around the opening with duct tape when you begin to fume. You could also use a plastic storage container that has a tight lid. Use duct tape on the lid joints to make them airtight. Make or select a chamber big enough to fit your parts, but not much bigger than you need or it will take longer to fume your wood. Arrange the wood in the container so that no piece is touching the others. Place a shallow glass dish in the middle of the chamber-glass works well because it doesn't react to the ammonia. Now, fill up your dish with ammonia, seal the chamber and let science take over. You'll need to replace the ammonia every eight hours. Have a bucket of water nearby to dilute the old ammonia in before disposing of it. There are lots of variables when it comes to getting the perfect results. The longer you keep the pieces in the container, the deeper and darker the tone will be. Your desired finish could need as little as eight hours or as long as a few days to get your desired results. And depending on the amount of wood you are fuming and the size of your container and dish, you may need to place more than one dish inside. Test your set-up on scrap wood that is same species and approximate size before moving on to your actual project pieces. Remember to put on your safety gear every time you open the container. To keep the results consistent for a project, fume all parts at the same time. -Jodi Avery MacLean
| Part | Material | Size (T x W x L*) | Qty. |
|---|
| Top rail | white oak | 3/4" x 5" x 47 5/8" | 1 |
| Bottom rail | white oak | 3/4" x 4" x 47 5/8" | 1 |
| Stiles | white oak | 3/4" x 4" x 34 1/2" | 2 |
* Length indicates grain direction
Recommendations

canadianhomeworkshop.com is part of the Blue Ant Media
Canada Network
© 2026 Blue Ant Media
More information
Social Media & RSS


Our other sites


No comments
To leave a comment, please log in
Don't have an user account? Register for free