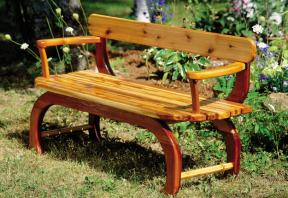
This bench is an eye-catching piece of outdoor furniture that can comfortably accommodate two people. The design’s curves are whimsical, while the seat is slightly dished for comfort. All parts are conveniently made from standard thicknesses of lumber, but for long-term durability, there isn’t a nail or screw anywhere. Dowel joinery is used throughout.
One design feature that makes this bench efficient to build is the similar leg and back support assemblies. Each is made of three layers of 1×6 lumber, and each layer is also made of three separate pieces of wood. Why this design? Together they make it easy to form open mortise-and-tenon joints that interlock to create strong joinery.
This loveseat also uses dowels to join parts. You’ll need at least six 3/8″-dia. dowel centres on hand to get all of the dowel holes aligned.
Prepare cedar for the leg and backrest laminations at the same time. Cut everything you need to length, choosing the nicest-looking boards for the outside faces of the laminations. Spread an even layer of weatherproof glue onto both faces of each course, working the adhesive into the wood a little. Ensure that the end-grain of the uprights is thoroughly wet with glue. As you work, lay the assembly on newspaper. Start laminating by installing clamps one inch in from each edge all the way around. Be careful to put a clamp at each end, squeezing the uprights into the rails and locking them together in a square orientation. You will shape the curves later.
Wait an hour or two for the glue to skin over, then scrape off as much of the squeeze-out as you can. Allow each U-shaped assembly to cure for 24 hours; leave it longer if it's humid. Remove the clamps, clean up any glue squeeze-out you couldn't reach before, then joint the top edges and the sides. Repeat the process for the other two laminated assemblies, then trim the two legs to length on the tablesaw. Leave the backrest assembly long for now.

The three seat supports span the bench between the front and rear leg assemblies, secured using two 3/8" dowels at each end. Cut the three seat supports to three inches wide and 16" long, then use a drawing bow to trace a smooth curve along the top edge of each seat support. Cut along the line with a bandsaw or jigsaw, then sand the curves smooth. Use a 3/8"-rad. roundover router bit to shape the bottom edges of each support piece, then drill a pair of 3/8"-dia. dowel holes 3/4" deep into the ends of each seat support.
Next, make the two round leg braces you need. You could use ready-made hardwood dowels, but making your own round cedar stock is best, so the leg braces match the rest of the bench.
Create the dowels by milling down two 1 1/2" x 1 1/2" x 16" pieces of cedar, then mark their centre points on the end-grain for the 3/8"-dia. x 3/4"-deep dowel holes you'll need to drill. The best way to find the centre is by drawing intersecting diagonal lines across each end. Use a 3/4" roundover bit in a router table to round the square corners of the blank. Sand the parts and you'll have terrific cedar dowels.
Mark the locations of the three seat supports and two leg braces on the two leg assemblies you built earlier. The two outer seat supports should be 11 3/8" from each end; the middle one is centred between the others. The leg brace dowels are also centred 3 1/2" from the bottom of the legs and 1 3/8" from the outer edges.
Put dowel centres in the holes you drilled in the ends of the three seat supports earlier, align the seat supports with marks on the U-shaped frames, then press the parts together to mark the dowel hole locations. The central spur on the dowel centres marks the inside surface of the leg assemblies in the places where you'll need to drill holes. As with the seat supports, make the holes 3/8"-dia. x 3/4" deep.

Dry-fit the front and rear legs, seat supports and leg braces using 3/8"-dia. x 1 1/4"-long fluted dowels. Ensure all the joints come together fully; sometimes slight dowel misalignment can cause joints to hang up, and you want to find and fix these problems now. Even if everything fits well, hold off on final assembly.
At this stage, the main support framework for the love seat could be glued together, except that all parts are still square. You need to cut the curves. Make a tracing template out of plywood for the legs, the back support and seat slats. One template does all three jobs.
Cut the curves for just the two leg assemblies with your bandsaw. Get a friend to help: these parts are heavy and awkward. After sawing, sand the inside and outside edges smooth, then round all curved edges and the front of the inside rail edge with a 1/2" bearing-guided roundover bit. Leave both edges of the centre rails square.
Glue the seat supports and leg braces to the leg assemblies and clamp them together. Adjust for square and allow them to cure overnight. Clean up any glue squeeze-out and sand smooth.
While you're waiting for the glue to dry, create the backrest assembly using the third U-shaped frame you set aside earlier. The backrest and the back support are built as a separate component, then added to the bench. Use the curved template you made to trace the shape, then saw along the lines, trim the uprights to 16 1/2" long, and then sand the cut edges smooth as you did with the legs. Create a 3/8"-deep x 3"-long dado in both uprights to accept the backrest.
Rip the backrest piece to width, trim to length and round the corners to a 2" radius. Rout a 3/8" roundover profile on all sides and ends. Get ready for dowels by drilling three 1/4"-dia. dowel holes in each upright, 3/4" deep in a triangular pattern. These dowel joints will connect the backrest to the back support assembly. Use dowel centres to transfer the locations of these holes to the backrest. Drill the dowel holes in the back, glue and clamp up.
Join the entire backrest frame to the seat assembly using 3/8"-dia. x 1 1/4" dowels. Centre the backrest frame onto the seat and make a couple of registration marks across the joint with a pencil so you can easily return the parts to the same spot. Drill pairs of dowel holes every eight inches along mating parts of the seat back; use dowel centres to align the holes. Dry-fit the joint, making adjustments if needed, then reassemble with glue.
Cut the six pieces of 2x4 lumber you'll need for the seat slats. Make them 52" long and 3 1/4" wide. Lay the slats on the seat frame, centred on the middle seat support with a 1/4" gap between each board. Use the inside edge of your handy leg template to draw an 8 1/2"-rad. curve on just the front two slats. Cut the curve and rout a 1/2" roundover profile on all the seat slats, including the ends. Go slow, taking light passes to avoid tearout on the end-grain. Rout a 3/4" roundover profile on the top of the front seat slat, then sand everything up to 150-grit.
Attach the seat slats to the seat frame using more dowels. Starting from the back, mark and dowel each seat slat. The four slats in the centre have a pair of dowels in each seat support located 3/4" in from each slat edge. The front and back slats have dowels located every eight inches along the edges. Use the same technique you employed earlier to drill aligned dowel holes. Drill, glue and clamp up slats until the seat is together.
Using the grid diagram as a guide, trace the pattern of the armrest onto your stock. First drill 3/8"-dia. x 3/4"-deep dowel holes into what will become the back ends of the armrests, then cut out the curved shape with a bandsaw or jigsaw. Make sure that the flat end of each armrest fits within the back profile with at least 1/4" of extra wood on each side. Smooth the curves with a drum sander, then rout a 1/2" roundover profile on the edges. Sand the wood smooth, then prepare the tusk-shaped armrest supports. Drill single 3/8"-dia. x 3/4"-long dowel holes in both ends of each tusk, cut these parts to shape and sand them.
The armrests are joined to the back support using dowels. Centre the armrest on the back support, tight against the backrest. Use dowel centres to transfer the locations of both holes. Also prepare dowel holes to join the armrest supports to the armrests, centred on their “fists.”
Dry-fit each armrest and armrest support, then join these two to the backrest assembly. You'll need to cut a slight angle to the base of the armrest support as the seat slat is in the curve of the seat supports. Roll a small pencil stub on the slat along the base of the armrests to trace the required mating angle. Shave enough off the supports to achieve the joint angle and adjust to make a perfect fit. Assemble each armrest support into an armrest and push them tight against the seat back. Use a dowel centre again to locate the holes required in the seat slat. Drill, glue and clamp the armrests and supports to the chair assembly.
Cut four cedar 1 1/4" x 2 1/2" leg pads from scrap. Screw these to the bottom ends of the legs to stop moisture from wicking into the end-grain. Replace them should they rot or become damaged.
Finish-sand the seat up to 150-grit paper, then sand all of the end-grain with 180- and 220-grit. This closes the wood's pores, making the finish on the end-grain more consistent. Finish the bench with your choice of exterior-grade wood finishes. I used outdoor clear Varathane for a glossy shine.
After the work is done, grab your favourite beverage and book, then invite your nearest and dearest to relax with you on your new loveseat.
| Part | Material | Size (T x W x L*) | Qty. |
|---|
| Seat slats | cedar | 1 1/2" x 3 1/4" x 52" | 6 |
| Seat supports | cedar | 1 1/2" x 3" x 16" | 3 |
| Leg braces | cedar | 1 3/8". dia. x 16" | 2 |
| Centre rail outer layers | cedar | 11/16" x 5" x 47 1/2" | 6 |
| Leg/back outer layers | cedar | 11/16" x 5 1/2" x 12 1/2" | 12 |
| Centre rail inner layers | cedar | 11/16" x 5 1/2" x 36 1/2" | 3 |
| Leg/back rail inner layers | cedar | 11/16" x 5 1/2" x 17 1/2" | 6 |
| Backrest | cedar | 1 1/2" x 5" x 52" | 1 |
| Armrests | cedar | 1 1/2" x 4 1/2" x 17 1/2" | 2 |
| Armrest support | cedar | 1 1/2" x 2" x 8" | 2 |
* Length indicates grain direction
Recommendations

canadianhomeworkshop.com is part of the Blue Ant Media
Canada Network
© 2026 Blue Ant Media
More information
Social Media & RSS


Our other sites


No comments
To leave a comment, please log in
Don't have an user account? Register for free