Rolling shop cabinet
Built to house a scrollsaw, this mobile cabinet was designed with comfort and storage in mind
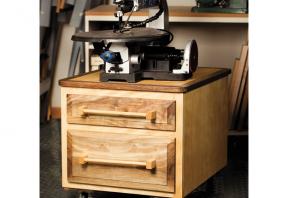


I suspect that all woodworkers love getting new tools. Opening the box, putting the parts together, trying out the tool-maybe even reading the owner’s manual. But for those who work in a small shop, that excitement of getting a new tool is tempered with the issue of where to put it. A new drill can usually be squeezed into a drawer or hung on the wall, but larger tools, such as a scrollsaw, require more room. That’s where the design challenge lies for this cabinet. I made this cabinet short enough to fit under other shop furniture, such as a bench or the wing of a tablesaw. I also thought about how a lot of people I’ve talked to say they like to sit down when using a scrollsaw. With this cabinet’s height, you can pull up a chair to the saw. The unit has locking casters, which means you can roll it out from storage, lock the wheels when in use, then roll it away when your job is done.
At its core, this project is a simple plywood cabinet. I chose contrasting wood to add visual appeal. Walnut drawer fronts and edging for the top provide a nice dark contrast against the pale maple and birch of the rest of the cabinet. I also made my own maple drawer pulls to add a little flair.
Before you begin, check the materials list and make any adjustments to the dimensions to suit your particular tool and your shop. I used a lot of pocket-hole joinery in building this project, but biscuits, screws or nails would also work well.
Prepare the Carcass
Begin bringing your stock to size by cutting out the pieces for the sides, bottom and back of the cabinet. Get started on the joinery by drilling pocket holes. They should be positioned on the inside faces of these pieces, so they are hidden when the cabinet is complete. Three or four pocket-hole screws along each connection, together with some glue, should provide plenty of strength to the cabinet joints.
Drill pocket holes along the front and back, as well as the top of the two side pieces. The cabinet is fairly short, so I recommend leaving the top off until later to give you access to the inside for mounting the drawers. However, you’ll want to make sure you drill pocket holes in the top at this stage for mounting the top later.
Next, drill pocket holes along all four edges of the back. The bottom section requires pocket holes along both sides, as well as along the front. Fasten the bottom to the two sides, then fit the back between the sides, tightening the screws securely. Glue squeeze-out isn’t a concern; these joints will be hidden.
Cut the top to size now, and rip enough walnut to 1 1/2″ wide for the edging. Again, drilling pocket holes in the underside of the top helps to align and attach the edging to the top. A rolling cabinet is liable to bump into things on occasion, so it’s a good idea to round off the sharp corners of the top. Draw a small-radius curve and cut off the corners with a jigsaw or bandsaw. Chamfer the edges with a hand plane or run them over a roundover bit chucked into a table-mounted router. With this done, set the top aside until later.
Frame It
Before cutting the face-frame members to length, check the dimensions of the actual cabinet. Drill two pocket holes in the end of each rail and fasten the pieces together. Leave a four-inch gap for the top drawer and 7 3/4″ for the bottom one. The pocket holes you made in the cabinet earlier should now be used to attach the frame to the front of the carcass.
I built my drawers with Baltic birch plywood. We tend to think of this material as being a half-inch thick, but its actual thickness is 12mm. Keep this in mind as you check measurements and set up the dado blade in the next steps.
Jump to a section
- Page 1 : Getting Started
- Page 2 : Raised Panels
To leave a comment, please log in


No comments