Turn closet space into office space
Here's a plan to truly maximize household space


When I was growing up, the kitchen table was our home office-the place where kids gathered at the end of the day to do their homework and where our parents sorted out the monthly household bills. Today, computers are used more and more to help us accomplish these tasks, creating the need for a dedicated home-office space to accommodate equipment, supplies and access to the Internet. When space is in short supply, finding a suitable location to set up shop can be a challenge.
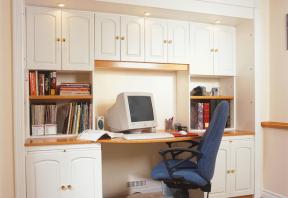
We solved this problem in our home by constructing a built-in office, tailored to fit in the opening of a closet and custom-designed from the ground up to meet our specific requirements. The entire renovation was less expensive than a room full of traditional office furniture, and the simple, modular approach made the office easier to build than typical furniture projects.
Getting started
There is no materials list for this project because every installation is different. The dimensions of the available space, as well as your personal requirements and budget, will determine the final design.
I got started by removing the closet doors, interior shelving and the trim that was in the way so I could inspect the space and take accurate measurements. Then I prepared detailed plans that included a 1/2″ gap on the top and sides to compensate for sloping floors and out-of-plumb walls. The gap was covered with trim after the unit was installed. I was also careful to leave a two-inch space at the back for computer cables and air circulation to keep sensitive electronics cool. It’s best to leave as much space here as you can.
Base cabinets
All of the cabinets are made from 3/4″ melamine panels screwed together using simple butt joints. Before assembly, cover the exposed panel edges with adhesive-backed melamine trim using a standard household iron. After the office insert is installed, cover any screw heads with plastic caps to make them less visible.
I started construction at the bottom by cutting out panels to make the two identical base units that support the desktop. Each base unit consists of a pair of side panels, notched at the bottom to receive a solid birch kickplate, a base panel installed directly above the kickplate and cross braces connecting the sides at the top. Use two braces at the front, separated by a narrow gap to accept a pullout work surface. Secure four rails inside the cabinet to form channels to support the sliding panel. A stop block attached to the top prevents the work surface from being brought out too far. Cover the cabinet backs with hardboard panels cut to fit flush and nail in place. Be sure to leave a two-inch opening for ventilation and the passage of cables directly behind any electronic components.
Jump to a section
- Page 1 : Setting up shop can be a challenge
- Page 2 : Drawer and desktop assembly
- Page 3 : Wall and ceiling panels
To leave a comment, please log in


No comments