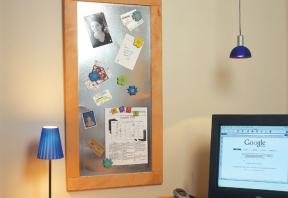
Magnetic message board fix materials
Hold down your clutter with this magnetic message board
A fresh supply of recent snapshots are fun to have on hand, but because I wanted a nicer place to show them than my refrigerator door, I built this magnetic display board. It looks better than the fridge, while still offering the freedom to update your photos easily, anytime.
Begin by making the long and short frame pieces out of any kind of wood you have. A tablesaw is ideal for cutting these pieces to width and length. If you can find wood that is already the right width off the shelf, then you can get along fine with a chop saw or even a good Japanese handsaw. Prepare 3/8″ x 2 1/4″ x 2 1/4″ lap joints on both ends of all frame parts. A tablesaw with a dado blade is the ideal tool for this task, although a handsaw and chisel are quite reasonable low-tech options.
It’s difficult to make attractive joints that include both end-grain and edge-grain surfaces. That’s why I chose to highlight the joint with a routed V-groove instead of trying to hide it. The easiest approach is to run a 45° chamfer around the perimeter of all the forward-facing edges. That creates a nice look all of the way around, with matching V-grooves across each joint.
After cutting and routing all your pieces, it’s time to assemble. Four small C-clamps and one web clamp do a great job here. Apply a thin film of glue to all joint surfaces, then lightly C-clamp each corner. Be sure to put scraps of wood under the clamp jaws to prevent the jaws from marring the frame as you tighten the clamp. Next, wrap the web clamp around the frame and tighten it up. Check to ensure that the frame is square by taking two diagonal measurements from corner to corner on the frame and comparing the two measurements- they should be equal. If they are, your frame is square. If not, adjust to equalize. Once you’re sure your frame is square, tighten up the C-clamps and clean up any glue squeeze-out.
After the glue has dried, remove the frame from the clamps, rout a 3/8″-wide rabbet around the back inside edge to accept the sheet metal and backer board, then square off the rabbet’s corners with a chisel. Adjust your rabbet depth to match the combined thickness of the back board and sheet metal you’re using, plus an additional 3/16″ to 1/4″ for a bead of caulking used to secure the sheet metal to the frame.
Now is a good time to apply a finish. I used a simple recipe, but it really brings out the grain. Start with pigment-free natural stain. The stain has no colour, but is designed to highlight the natural grain of the wood. Complete the job by applying a couple of coats of polyurethane as a protective top layer.
Cut your sheet metal and backer board to size, then put the two pieces into the frame before running a bead of silicone caulking all around the perimeter to hold them in place. Install hooks and wire to hang the board. Remember that this frame can be hung horizontally or vertically.
This project could also be used to frame a variety of other materials, such as a mirror, a dry-erase whiteboard or, of course, even a picture.
Materials you will need:
Short frames
pine
3/4″ x 2 1/4″ x 16″
2
Long frames
pine
3/4″ x 2 1/4″ x 40 1/2″
2
Back board
hardboard
3/16″ x 12 1/4″ x 36 3/4″
1
Magnetic surface
light-gauge sheet metal
12 1/4″ x 36 3/4″
1
To leave a comment, please log in


No comments