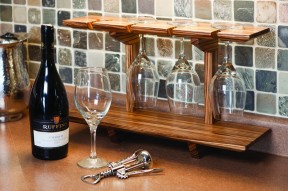
Some woodworking projects are solo efforts; others are more collaborative. The design committee for this project—namely, my wife, Marianne—wanted a wineglass shelf for our kitchen counter. Her stipulations were simple: the shelf must hold four of her treasured wineglasses, and it must not look like a traditional, round wineglass display shelf. Although zebrawood is an expensive hardwood, it was my first choice for this project because of its dramatic grain. Since there is not much material required for my design, the cost won’t hurt the pocketbook. This display shelf consists of four primary parts: a top shelf, a bottom shelf and two support brackets. Mill all wood to a final thickness of 3/4″, then start building.
Skill
1
Each support bracket is made from three pieces of wood—a spine, an upper support and a lower support—all measuring 3/4" thick x 1 1/2" wide. I used dowel joinery to assemble these supports because it’s not only fast and accurate, it’s strong. Drill the necessary dowel holes for the support brackets using a dowelling jig, and then dry-fit the upper and lower supports onto the spine using two 3⁄8"-diameter x 1 1/2"-long dowels at each joint. Once you are sure that the joinery fit is perfect, glue and clamp the support assemblies before setting them aside to dry. Check that both the upper and lower supports are perfectly square to the spines before walking away. Once the glue has dried on both, remove the supports from their clamps and cut the angles on the upper and lower supports on the bandsaw according to the plans. Finally, sand both supports using 150-grit sandpaper.
At the tablesaw, cut the top shelf to 5" wide x 18" long. Next, lay out holes and slots for the stems of the glasses, following the dimensions that work best for your stemware. For my project, I used four 1 1/2"-diameter holes and 1/2"-wide slots. The layout is shown on the plans. Place a sacrificial backerboard under the top shelf to prevent tearout before bringing the workpiece to the drillpress and using a 1 1/2"-diameter Forstner bit to bore the four holes. Return to your tablesaw and attach a 6"-tall wooden fence to your mitre gauge. Stand the top shelf on its front edge, and then cut the slots for the wineglass stems. I made several passes to achieve each 1⁄2"-wide slot. The next step is to round over the inside edges of the 1 1/2" holes for the glasses with a router and a 3/8"-radius roundover bit. The final machining operation for the top shelf is to bevel the underside of the shelf’s front and side edges. I performed this step at the tablesaw with the blade tilted 30° from square. I’ve always liked this bevel feature on smaller projects; it gives the illusion of a lighter, more graceful-looking design while maintaining the strength of 3/4"-thick material.
The 6"-wide bottom shelf requires fewer machining operations than the top, but there is one critical issue: the location of the two notches that house the supports. When the wineglasses hang from the top shelf, they must hang straight, free from interference from the supports. Therefore, the notches that house the support brackets must be perfectly centred between the first and second holes, and between the third and fourth holes, on the top shelf. This arrangement requires the centre of each notch to be exactly 5" in from either end of the bottom shelf. With the placement of the notches drawn on the lower shelf, cut the notches on the tablesaw the same way you cut the slots in the top shelf. With that tall fence fastened to the mitre gauge, use multiple passes to sneak up on the final width of the notches to get a snug fit for the support brackets. Complete the bottom shelf by bevelling the bottom front edge and the ends for looks, just as you did with the top shelf.
screws driven through each of the lower supports into the underside of the bottom shelf. Install the top shelf by placing a small bead of glue on the upper support and a single #8 x 1 1/2"-long countersunk screw driven up through the bottom of the upper support and into the underside of the top shelf. After the glue dries, re-sand the entire project using 180-grit sandpaper. I finished my shelf with three coats of satin lacquer. We recently had friends over for dinner, and when the wine and the wineglasses were brought to the table, a strange thing happened: the conversation didn’t turn to Marianne’s treasured wineglasses. The bulk of the table talk focused on the wineglass display shelf. As a woodworker, I couldn’t have been happier.
| Part | Material | Size (T x W x L*) | Qty. |
|---|
| Top shelf | 3/4" x 5" x 18" | 1 | |
| Bottom shelf | 3/4" x 6" x 18" | 1 | |
| Spine | 3/4" x 1 1/2" x 7" | 2 | |
| Upper support | 3/4" x 1 1/2" x 4 1/4" | 2 | |
| Lower support | 3/4" 1 1/2" 5 1/4" | 2 | |
* Length indicates grain direction
jointer
planer
tablesaw
drillpress
router
drill
No comments
To leave a comment, please log in
Don't have an user account? Register for free