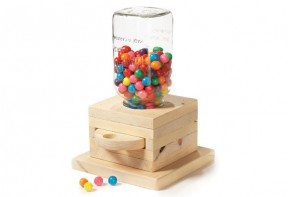
Who wouldn’t love to find this hand- crafted gift under the Christmas tree, complete with brightly coloured gumballs begging to be released? This simple project is sure to bring a smile to someone’s face. I used a one-litre jar for this project, but you can use other sizes. The key dimension for the jar is the 2 3/4″-diameter mouth.
Think of this project as a pine sandwich. Five layers of wood form the body, with a sixth making the base. Start with a 3'-long piece of 1x6 and cut it into three equal parts. Although the final dimensions of the project body will be 5 1/2" x 5 1/2", the extra length comes in handy for clamping and cutting. These three workpieces will become the top three layers of the pine sandwich. Mark each piece A through C, since each piece gets a different treatment. Also, remember that all of the pieces alternate their grain direction for strength and appearance. Pieces A, C and E have their end-grain edges facing the front; pieces B and D have end-grain edges on the sides.
Begin with Piece B, the second board from the top. There’s a 2"-diameter hole in this piece for the gumballs to drop through but, since the hole is covered, it’s a perfect place to practise your skills. It’s best if you have the right size of hole saw, but a jigsaw will do. Either way, find the centre of the board and draw a line along its length. Next, mark a 5 1/2" x 5 1/2" square on the 12"- long blank. From one of the edge-grain ends, mark two spots: one 1⁄2" in from the edge on the centre line, and another spot 2" along the centre line. Place the point of a compass on the 2" mark and draw a 2"-diameter circle. Clamp the wood to your bench, cut the gumball hole, then clean up the edges with a half-round file.
On the underside of the blank that will become Piece A, draw a 5 1/2" x 5 1/2" square, and then draw diagonal lines from corner to corner within this square to find the centre. Draw a circle with a 23⁄4" diameter centred on this point. Next, clamp the workpiece to a table and cut out the circle. Test-fit your Mason jar and adjust the opening as needed for a snug fit. For Piece C, mark the usual 5 1/2" x 5 1/2" square on the oversized blank, but this time give yourself at least 2" of additional material on each end of the square. From the front of the square (remember: end-grain is at the front this time), measure and mark 1/2" in from the edge on centre. Set your compass on this mark and draw a 4"-diameter circle. Cut out this circle carefully, as it will become the rotating wheel that doles out the gumballs. Start from the waste side of the square and cut on the outside of your pencil line. Sand the edges of the wheel as well as the arc cut out on Piece C.
Pieces D and E need no special work; they’re just squares. Complete this stage by clamping a stop block set at 5 1/2"" on your mitre saw and cut all five pieces to 5 1/2" long.

The gumball wheel spins on a dowel that is set into holes drilled in Pieces B and D. Clamp these two pieces together and drill a 1/4"-diameter hole through both workpieces at the same time. The plans show where this dowel is centred, set 1/2" in from the edge-grain front edges.
Next, drill a 5/16"-diameter hole through the centre of the wheel for the dowel. The wheel needs a second hole, a larger one into which the gumballs drop. Measure in 3/4" from anywhere along the wheel’s edge and mark a point. Using a spade or Forstner bit centred on that mark, drill a 1"-diameter hole through the wheel. Be sure to place scrap wood beneath the wheel to prevent tearout. If you know you’ll be using small gumballs, you should create a smaller-diameter hole. Round over the top of this hole with a file or sandpaper so the gumballs will flow smoothly downward. Finally, cut a 2" length of 1/4"-diameter dowel for the swivel point. You’ll need to have this dowel handy during the assembly process that comes next.
You are now ready to make your pine sandwich! Dry-fit the workpieces to see if any adjustments are required. Be especially careful to check that the wheel spins easily without binding. Sand as needed for smooth operation.
Begin assembly at the bottom and work your way up. Glue and clamp Pieces D and E together and drive in four finishing nails or brads to stop the pieces from sliding around. (Even with clamps applied, large glued joints like this have a mind of their own.) Next, add Piece C to the assembly, making sure its front face is flush with the fronts of E and D.
Next comes Piece B, but before it goes on, insert the dowel in the hole in Piece D, slip the wheel overtop, and then cap it all with Piece B, secured using more glue and brads. Finish up this stage by capping everything with Piece A.
At this point, you will have a block of wood with part of the wheel sticking out at the front. The edges of all layers should be flush, but they probably won’t be perfect. Sand all discrepancies smooth on the three flush sides.
Before you fasten the 7 1/4" x 7 1/4" base, you may choose to rout its top edge. You have just completed your very own gumball machine. Now, if only there were a coin slot.
| Part | Material | Size (T x W x L*) | Qty. |
|---|
| Pieces A to E | 1x6 pine | 3/4" x 5 1/2" x 5 1/2" | 5 |
| Wheel | 1x6 pine | 3/4" x 4"-diameter | 1 |
| Base | 1x8 pine | 3/4" x 7 1/4" x 7 1/4" | 1 |
| Swivel dowel | 1x6 pine | 1/4"-dia. x 2"-long | 1 |
* Length indicates grain direction
mitre saw/tablesaw
drillpress/drill
palm sander
jigsaw
Recommendations

canadianhomeworkshop.com is part of the Blue Ant Media
Canada Network
© 2026 Blue Ant Media
More information
Social Media & RSS


Our other sites


No comments
To leave a comment, please log in
Don't have an user account? Register for free