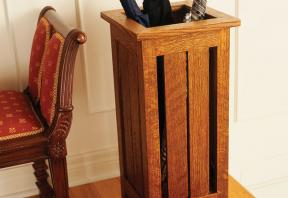
The problem with umbrellas is that you often can’t find one when it’s raining. Put an end to that soggy situation by building this functional and attractive Mission-style umbrella stand for your front hall. I used quartersawn white oak to build mine, a traditional material for Mission furniture, although any lumber you choose will work fine.
Begin by cutting out blanks for the legs, rails and slats from 3/4"-thick wood. The plans show how the bottom of the legs are tapered to form feet, and the edges are mitered 45º where they meet in the corners. Mill a 3/8"-wide x 1/2"-deep groove along the edge of each rail to accept the vertical slats, then run the slat blanks through the surface planer until they slide smoothly into the grooves. This kind of operation is one of the hidden advantages of owning a planer. It gives you the ability to bring the thicknesses of parts down to fit precisely into precut slots, grooves and channels, making it easier to create tight joinery.

I used #20 biscuits to reinforce the corners of the L-shaped legs and #0 biscuits to make the connection between the legs and rails. You'll find 5/16" x 1 1/2" fluted dowels are an excellent alternative if you don't own a biscuit joiner. Either way, prepare all the biscuit slots or dowel holes now. Before final assembly, you'll need to notch the corner of the #0 biscuits where they protrude into the rail slots.
Sand all the parts, then you're ready to assemble the base. Start by sliding the slats into the rail grooves with a dab of glue applied to the centre section of the slat ends to stop them from moving. By only gluing the centre, you allow the wood to move laterally as it expands and contracts with the seasons. Next, dab glue on the ends of the rails and connect them to the legs to form four separate panels. When the parts are dry, bring the frames together and secure the entire assembly with biscuits using two or three web clamps. Check for square, tight corners before setting the base aside to dry. You can close small gaps in the outside tip of the miters by drawing the shank of a screwdriver up and down the corner with moderate pressure while the glue is wet, which bends the wood inward, closing tiny flaws.
After the clamps are removed, tack cleats to the lower rails, creating a ledge to support the bottom panel. Glue and finishing nails work well. Cut the bottom panel to fit and slide it into position from the top of the base. Apply glue to the top of the cleats to secure the bottom panel.
Next, cut the trim pieces that cap the top of the stand. Miter them at the corners, like a picture frame, and use #20 biscuits to reinforce the joints. Assemble the cap frame with glue and biscuits, then set it aside to dry. When the clamps are released, spread glue on the top edge of the stand, centre the cap frame on it, then tack the frame in place with a few finishing nails. After filling the nail holes and giving the project a final sanding, you're ready to apply the finish of your choice.
I applied a pre-stain conditioner before wiping on two coats of dark oak stain. Conditioner helps prevent a blotchy finish by evening out stain absorption. Next came three coats of wipe-on polyurethane for durable protection. I recommend sanding with #240-grit paper between applications and wet-sanding with #600-grit wet/dry paper after the last coat of poly has cured for a full week. You'll find that this method creates a silky smooth finish.
As you move your handiwork near the door and fill it with umbrellas, relax. You're ready for the next rainy day.
| Part | Material | Size (T x W x L*) | Qty. |
|---|
| Legs | quartersawn white oak | 3/4" x 1 1/2" x 24" | 8 |
| Rails | quartersawn white oak | 3/4" x 2" x 7" | 8 |
| Slats | quartersawn white oak | 3/8" x 2 1/2" x 19" | 8 |
| Cap strips | quartersawn white oak | 3/4" x 1 3/4" x 11 3/4" | 4 |
| Bottom panel | quartersawn white oak | 3/8" x 8 1/2" x 8 1/2" | 1 |
| Cleats | quartersawn white oak | 3/8" x 3/8" x 8 1/2" | 4 |
* Length indicates grain direction


Recommendations

canadianhomeworkshop.com is part of the Blue Ant Media
Canada Network
© 2025 Blue Ant Media
More information
Social Media & RSS


Our other sites


No comments
To leave a comment, please log in
Don't have an user account? Register for free