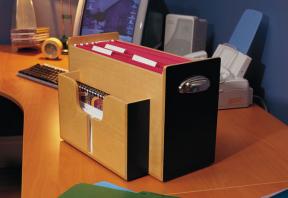
The key to making this handy desktop filer is accurate cuts. I used 3/8″ and 1/2″-thick Baltic birch ply for mine, but you could use more traditional plywoods, medium-density fiberboard (MDF) or even solid wood. With a few adjustments you can size your project to fit more (or fewer) files. For legal-size files, make the box depth 9 1/2″ from the top of the aluminum angle strips to the box bottom, with the metal 15 1/8″ apart. Everything else is open to your interpretation, so have some fun!
Start by cutting the sides to size, beveling the bottom and inside ends to 45°. Cut the side linings now from 1/2"-thick stock, then glue and clamp one lining part to each inside surface of both sides. Note how the sides and lining parts create a rabbet on the ends where they come together.
Cut the front and back pieces now, then glue and clamp the front only into the rabbeted edges of the sides. Leave the back piece off for now. Next, cut the bottom piece, mitre the ends to match the mitred edges of the side parts, then glue, clamp and nail the bottom section to the lower edges of the front and sides.
The front pocket comes next. It's built on its own, then attached to the main box after assembly. Cut all the parts now with mitred edges on the bottom ends of the pocket sides and bottom. Attach one pocket front flush with the front edge of its matching side member, then attach the bottom piece to both. Secure the opposite side with glue and nails before adding the second pocket-front part. When the glue has dried, clamp the completed pocket assembly to the front of the file box, centred, with bottom parts flush. From the inside of the box, predrill countersunk holes to secure the pocket assembly, two screws per side. Now you can finally glue and clamp the box back in place. Countersink the nails, fill the holes, then sand the entire project.

Paint or seal this project any way you like. If you're planning a contrasting colour scheme as I did, remove the front pocket assembly to make the process easier. I applied two coats of black acrylic paint using a disposal foam brush, followed by two coats of satin, water-based polyurethane. Use a hacksaw to cut the strips of aluminum angle to length for the top of the box, then fasten it with two #4 x 1/2"-long screws in each piece. Add the pulls to the sides and some self-adhesive floor glides to the bottom and you're all set to control paper in your home office.
| Part | Material | Size (T x W x L*) | Qty. |
|---|
| Sides | Baltic birch plywood | 3/8" x 6 3/4" x 10 3/4" | 2 |
| Side lining | Baltic birch plywood | 1/2"x 6" x 9" | 2 |
| Front/back | Baltic birch plywood | 3/8"x 9 1/2" x 16 1/8" | 2 |
| Bottom | Baltic birch plywood | 3/8"x 6 3/4" x 16 7/8" | 1 |
| Pocket fronts | Baltic birch plywood | 3/8"x 5 1/2" x 7" | 2 |
| Pocket sides | Baltic birch plywood | 3/8"x 2 1/2" x 7 3/8" | 2 |
| Pocket bottom | Baltic birch plywood | 3/8"x 2 1/2" x 12 3/4" | 1 |
| Aluminum angle | 1/2"x 1/2" x 6" | 2 | |
| Pulls | Lee Valley 01A57.22 | 2 | |
* Length indicates grain direction
Recommendations

canadianhomeworkshop.com is part of the Blue Ant Media
Canada Network
© 2026 Blue Ant Media
More information
Social Media & RSS


Our other sites


No comments
To leave a comment, please log in
Don't have an user account? Register for free